Device Communication Tutorial
1. Introduction
This tutorial provides a hands-on guide for how to send data from an edge device to a cloud service.
To walk through the tutorial, the following is needed:
- An account on the RIoT Secure Platform
- A device that is enrolled with the RIoT Secure Platform and can access the network (over WiFi or other network type)
- Basic knowledge of how to write application firmware in C++ using the Arduino IDE
- Access to web server with PHP support
- Basic knowedge about PHP scripting and the JSON data format
- Familiarity with the RIoT Secure Management Console and application firmware updates
Source Code
Download Communication Tutorial Source Code2. Example Application
The tutorial application RIoTCounter sends a counter value from the edge device to a web server at regular intervals. The device status can be monitored using a Web UI.
2.1. Application Overview
There are three main components involved in this application:
Edge Device. The edge device runs the application firmware that sends data to the cloud. The application firmware keeps a counter value in a variable, which is incremented each time it is sent to the server. This firmware is written in C/C++ using the Arduino IDE.
Cloud Server. The cloud server is the end point for the data. This is a web server that receives incoming data. On the web server, there is a PHP script (server.php) that accepts data in JSON format. This script saves device data to a file (data_counters.json). There is also a PHP script for accessing the data, which is used by the Web UI (server-get-counter-data.php).
Web UI. The UI for viewing device data is also located on the web server. This component consists of an HTML file.
2.2. Application Files
The Communication Tutorial zip file has the following directory structure:
communication/
  RIoTCounter/
    cloud/
      server.php                   // server end point
      server-get-counter-data.php  // server data access
      dashboard-counter.html       // web UI
      riotsecure-logo.png          // graphics
    embedded/
      CounterUnoR4/                // sketch for Arduino Uno R4 WiFi
        CounterUnoR4.ino           // main file
        application.h              // application code
        riotuart.h                 // library code
      CounterUnoMega/              // sketch for Arduino Uno and Arduino Mega
        CounterUnoMega.ino         // main file
        application.h              // application code
        riotuart.h                 // library code
2.3. Application Firmware
Install the application firmware on the edge device using the Arduino IDE and the RIoT Secure Management Console. See sections 4.9 and 4.10 for further details on how this is accomplished.
2.4. Cloud Server Files
2.4.1. Server Configuration
The customer cloud server is a web server set up and maintained by the developer.
Note that the web server should be configured to support PHP, and that sufficient file write permissions are set.
2.4.2. Server Files
The following files should be uploaded to the web server. They can be uploaded to the web server root, or to a subdirectory.
Server script files:
server.php
server-get-counter-data.php
Web UI files:
dashboard-counter.html
riotsecure-logo.png
The following JSON data file is created and updated by server.php (ensure that file permissions are enabled to allow creating and writing to this file):
data_counters.json
To view the device data in a web browser, use a URL with the following format (assuming the above files are in the cloud web server directory):
https://mywebserver.com/data_counters.json
2.4.2. File Overview
Click to view server.php
<?php
/*
File: server.php
Receiving script on the integration server - accepts a PUT request with JSON data.
This code is part of the communication code example RIoTCounter.

TODO: You must edit the code below to use your bearer token.
*/

// TODO: Edit code to use your bearer token
define("BEARER_TOKEN", "YOUR-BEARER-TOKEN");

// Call main function
main();

function main()
{
  // Get PUT data
  $json = file_get_contents('php://input');

  // Validate incoming request using Bearer authentication
  $success = verify_bearer(BEARER_TOKEN);
  if (!$success)
  {
    http_response_code(401);
    exit();
  }

  // Log the data
  $device_data = json_decode($json);
  $device_data = process_data($device_data);
  $result = log_data($device_data);

  // Send response to device
  $reponse_data = new stdClass();
  if (false !== $result)
  {
    $reponse_data->Message = "OK"; // OK
  }
  else
  {
    $reponse_data->Message = "ER"; // ERROR
  }

  echo json_encode($reponse_data);
}

// Function that verifies the bearer token
function verify_bearer($token)
{
  $success = false;

  $headers = apache_request_headers();

  if (array_key_exists("Authorization", $headers))
  {
    $auth = $headers["Authorization"];
    $auth_parts = explode(" ", $auth, 2);
    $success = ($auth_parts[0] === "Bearer") && ($auth_parts[1] === $token);
  }

  return $success;
}

// Process device data by adding and removing entries
function process_data($device_data)
{
  // Remove entries of less interest for this application
  unset($device_data->memory);
  unset($device_data->hardware);

  // Add server date and time
  $device_data->date = date('y-m-d H:i:s');

  // Add device id
  $device_data->device_id = device_id_from_guid($device_data->guid);

  return $device_data;
}

// JSON data is written to a log file. The format of the log file
// is a JSON array. The first element in the array is the most recent.
function log_data($device_data)
{
  // Set destination file
  $file_name = __DIR__ . "/data_counters.json";

  // Existing data array
  $log_data = [];

  // Check if file exists
  if (file_exists($file_name))
  {
    // Read file
    $json = file_get_contents($file_name);
    $log_data = json_decode($json);
  }

  // Add device data as the first element
  array_unshift($log_data, $device_data);

  // Maintain max array length
  if (count($log_data) > 20)
  {
    array_pop($log_data);
  }

  // Write file
  $json = json_encode($log_data, JSON_PRETTY_PRINT);
  $result = file_put_contents($file_name, $json, LOCK_EX);
  if (false === $result)
  {
    return false;
  }
  else
  {
    return true;
  }
}

// Extract tenant id from the GUID
function tenant_id_from_guid($guid)
{
  $bytes = str_split($guid, 2);
  $byte_0 = hexdec($bytes[0]);
  $byte_1 = hexdec($bytes[1]);
  $R = 82; //ord("R");
  $I = 73; //ord("I");
  $tenant_id = (($byte_0 ^ $R) << 8) | ($byte_1 ^ $I);

  return $tenant_id;
}

// Extract device id from the GUID
function device_id_from_guid($guid)
{
  $bytes = str_split($guid, 2);
  $byte_2 = hexdec($bytes[2]);
  $byte_3 = hexdec($bytes[3]);
  $o = 111; //ord("o");
  $T = 84;  //ord("T");
  $device_id = (($byte_2 ^ $o) << 8) | ($byte_3 ^ $T);

  return $device_id;
}
Click to view server-get-counter-data.php
<?php
/*
File: server-get-counter-data.php
Return device JSON data.
This code is part of the communication code example RIoTCounter.
*/

header('Access-Control-Allow-Origin: *');
echo file_get_contents('data_counters.json');
Click to view dashboard-counter.html
<!--
File: dashboard-counter.html

This code example illustrates a basic dashboard that displays devices and
their counter values. This example is part of the communication code
example RIoTCounter.

Data in file data_counters.json is fetched and used to update the dashbord
device items.

The file data_counters.json contains data for the 20 most recent device
connections. Entries are sorted with the most recent one first. The same
device may occur multiple times in the data (if there is a single active
device, all entries will belong to this device).

To test the UI with miltiple devices, this can be simulated. A function
that does this is found at the end of this file.
-->
<!DOCTYPE html>
<html>
<head>
  <meta charset="utf-8">
  <meta name="viewport" content="width=device-width, user-scalable=yes, initial-scale=1.0, shrink-to-fit=no" />
  <title>Counter Dashboard</title>
  <style>
    html
    {
      width: 100%;
      margin: 0;
      padding: 0;
      box-sizing: border-box;
    }
    *, *:before, *:after
    {
      box-sizing: inherit;
    }
    .dashboard
    {
      width: 100%;
      max-width: 600px;
      padding: 10px;
      font-family: sans-serif;
    }
    .dashboard-logo img
    {
      width: 90px;
      height: auto;
    }
    .dashboard-header
    {
      font-size: 1.8rem;
      margin: 5px 0px 20px 0px;
      padding-left: 5px;
      padding-bottom: 10px;
      border-bottom: 1px solid black;
    }
    .dashboard-card
    {
      border: 1px solid black;
      border-radius: 5px;
      padding: 20px;
      width: 100%;
      margin: 20px 0px;
    }
    .dashboard-card-gray
    {
      opacity: 0.5;
    }
    .dashboard-card-title
    {
      font-size: 1.4rem;
      margin: 0px 0px 5px 0px;
    }
    .dashboard-card-field
    {
      font-size: 1.1rem;
      margin: 5px 0px 0px 0px;
    }
    </style>
</head>

<body>
  <div class="dashboard">
    <div class="dashboard-logo"><img src="riotsecure-logo.png" /></div>
    <div class="dashboard-header">Counter Dashboard</div>
    <!--<div class="dashboard-card" id="device-52">
      <div class="dashboard-card-title">Device: <span class="field-id">52</span></div>
      <div class="dashboard-card-field">Counter: <span class="field-counter">1</span></div>
      <div class="dashboard-card-field">Last seen: <span class="field-lastseen">date</span><div>
    </div>-->
  </div>
</body>

<script>
  let Devices = {}; // Used to track seen devices
  let DeviceInactiveAfter = 60 * 1000; // One minute
  let DashboardUpdateInterval = 5000;  // 5 seconds
  let ServerURL = '/server-get-counter-data.php';

  async function fetchDataAndUpdateCards()
  {
    try
    {
      let url = ServerURL;

      // Get JSON array with entries that contain packet data
      let response = await fetch(url);
      const data = await response.json();
      //console.log(data); // debug logging

      // Update UI
      updateCards(data);
      checkInactiveDevices();

      // Fetch again after delay
      setTimeout(fetchDataAndUpdateCards, DashboardUpdateInterval);
    }
    catch (error)
    {
      console.log('Error fetching data');
      console.log(error);

      // Sometimes data with zero length is received
      // Fetch data again after delay
      setTimeout(fetchDataAndUpdateCards, DashboardUpdateInterval);
    }
  }

  function updateCards(data)
  {
    // Track seen device ids
    let seenDevices = new Set();

    // Loop through the entries update devices
    // The order of entries is the most recent ones first
    // A device can have multiple entries, we only use
    // the first entry and track devices in seenDevices.
    for (let entry of data)
    {
      // Packets arrray must not be empty
      if (Object.hasOwn(entry, 'packets') && entry.packets.length > 0)
      {
        //console.log(entry); // debug log
        // For simplicity use the first packet in the array
        // (there may be multiple packets)
        let packet = entry.packets[0];
        // It must be a CounterPacket
        if (Object.hasOwn(packet, 'CounterPacket'))
        {
          // Get the device id
          let deviceId = entry.device_id;
          // Only update if not seen
          if (!seenDevices.has(deviceId))
          {
            // Mark device as seen
            seenDevices.add(deviceId);
            // Get counter value
            let counter = packet.CounterPacket.Counter;
            // Get timestamp
            let timestamp = packet.ts;
            // Update device card
            cardAddOrUpdate(deviceId, counter, timestamp);
          }
        }
      }
    }
  }

  function checkInactiveDevices()
  {
    let now = Date.now();
    for (const [key, timestamp] of Object.entries(Devices))
    {
      if (now - timestamp > DeviceInactiveAfter)
      {
        // Not seen for X seconds, display as inactive
        let card = document.querySelector('#device-' + key);
        card.classList.add('dashboard-card-gray');
      }
    }
  }

  function cardAddOrUpdate(deviceId, counter, timestamp)
  {
    // Set last seen
    let date = new Date(timestamp).toISOString();
    let lastseen = date.substring(0, 10) + ' ' + date.substring(11, 22) + ' UTC';

    // Does a card for this device exist?
    if (Object.hasOwn(Devices, deviceId))
    {
      // Device card exists - update it
      let card = document.querySelector('#device-' + deviceId);
      let counterNode = card.querySelector('.field-counter');
      let lastSeenNode = card.querySelector('.field-lastseen');
      counterNode.textContent = counter;
      lastSeenNode.textContent = lastseen;
      card.classList.remove('dashboard-card-gray');
    }
    else
    {
      // Card does not exist - add new card for this device
      cardAdd(deviceId, counter, lastseen);
    }

    // Update timestamp for device
    Devices[deviceId] = timestamp;
  }

  function cardAdd(deviceId, counter, lastseen)
  {
    let dashboard = document.querySelector('.dashboard');
    let html = cardCreateHtml(deviceId, counter, lastseen);
    let card = document.createRange().createContextualFragment(html);
    dashboard.appendChild(card);
  }

  function cardCreateHtml(deviceId, counter, lastseen)
  {
    return `<div class="dashboard-card" id="device-${deviceId}">
      <div class="dashboard-card-title">Device: <span class="field-id">${deviceId}</span></div>
      <div class="dashboard-card-field">Counter: <span class="field-counter">${counter}</span></div>
      <div class="dashboard-card-field">Last seen: <span class="field-lastseen">${lastseen}</span><div>
    </div>`;
  }

  // Display live data
  fetchDataAndUpdateCards();

/*
  // Use the following for testing the UI with multiple simulated devices
  function testDeviceCards()
  {
    DeviceInactiveAfter = 5000;
    let counter = 1;
    function updateDeviceCards()
    {
      let deviceId = (Math.floor(Math.random() * 5)) + 42;
      let timestamp = new Date();
      ++ counter;
      cardAddOrUpdate(deviceId, counter, timestamp);
      checkInactiveDevices();
      setTimeout(updateDeviceCards, 1000);
    }
    setTimeout(updateDeviceCards, 1000);
  }

  testDeviceCards();
*/
</script>
</html>
2.5. Web UI
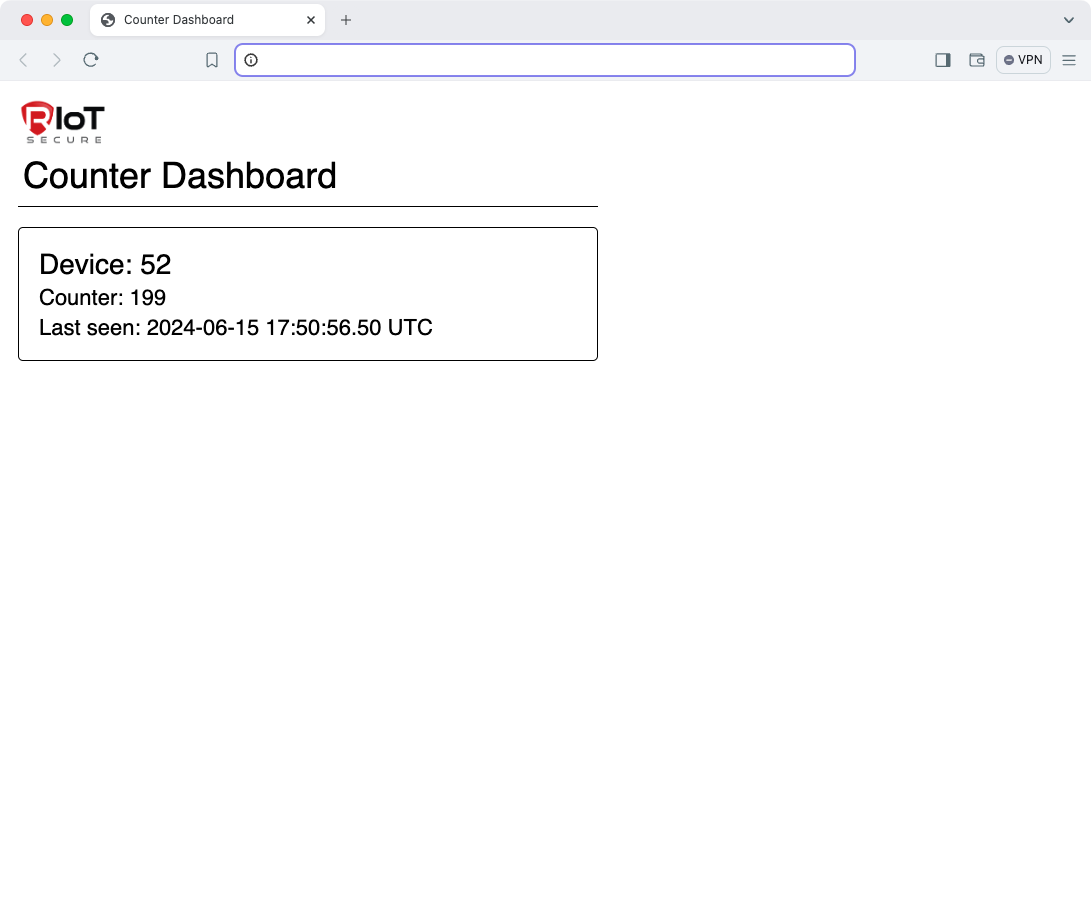
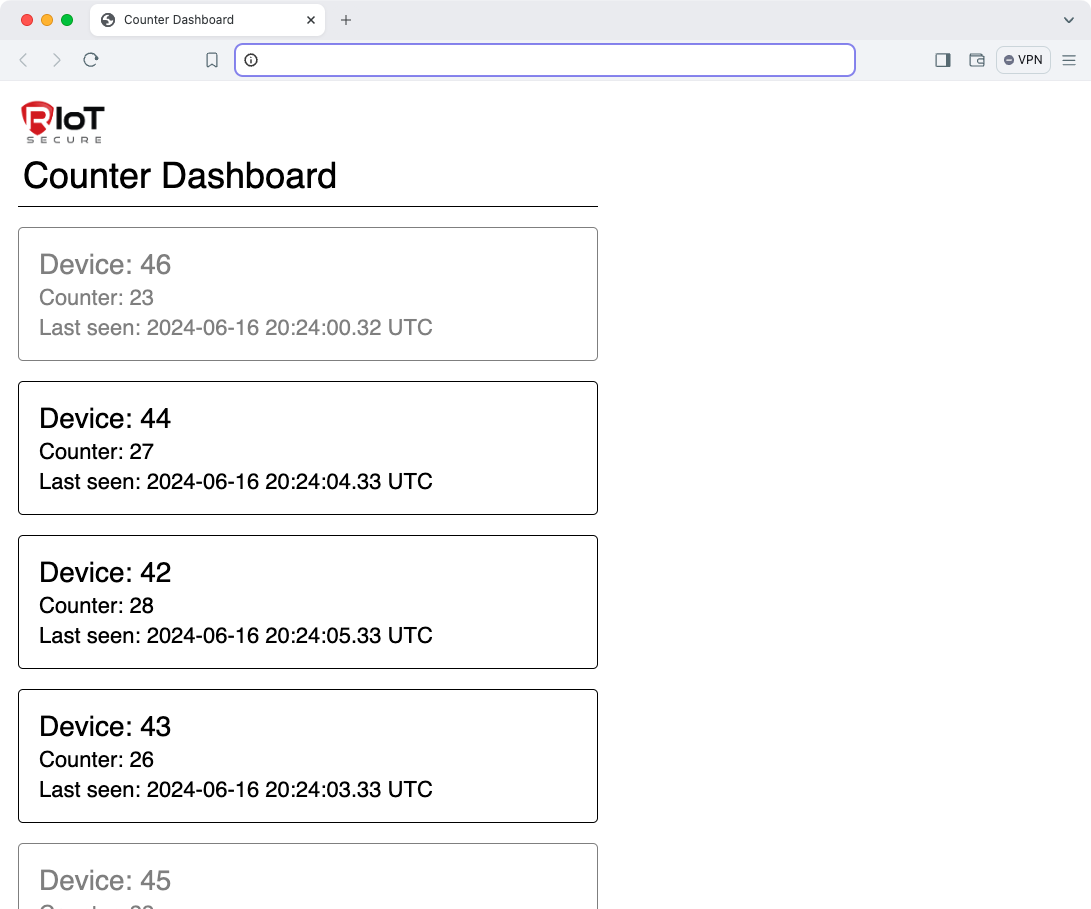
Here is a screenshot of the Web UI for RIoTCounter, with a single device connected. If multiple devices are connected, they are shown as a list.
To access the Web UI, use a URL on the following format:
https://mywebserver.com/dashboard-counter.html
The file dashboard-counter.html can also be opened in a web browser from the local file system.
2.6. Destination URL
The URL to server.php should be set as the Destination URL in the Management Console.
For example:
https://mywebserver.com/server.php
3. Cloud Application Architecture
3.1. Components
Develoment of an IoT application that communicates with the cloud consists of specifying the following components:
Destination URL (also known as Integration URL). This is the URL of the server that will receive the device data. The Destination URL is specified in the Management Console on the Settings Screen. The URL is specified per tenant, and is shared by all devices of a tenant.
Enable Integration. Each device needs to have integration enabled to be able to send data to the cloud. This setting is done in the Management Console on the Devices Screen. This setting is per device, and is needed for each device that sends data to the cloud.
Packet Definition. The packet definition specifies the format of the data packets sent from the edge device. Packets formats are specified in the Management Console on the Packets Screen.
Application Firmware. The application firmware running on the edge device creates data packets according to the packet format definition, and sends packets to the cloud. The application firmware is written in C++ using the Arduino IDE.
Customer Cloud Server. The Destination URL points to the server (Customer Cloud) that will receive the data. The server software can be written using any programming language that can accept HTTPS requests. In this tutorial, a web server running PHP is used.
Application UI. The Application UI is used to access the cloud data from the a browser. In this tutorial, a Web UI is used, implemented in HTML/CSS/JavaScript.
3.2. Messaging
Device messages are relayed via the IoT Server, which is a system component of the RIoT Secure Platform.
The message flow looks like this:
Device Application Firmware (binary data) -->
  Device Core Firmware      (binary data) -->
    IoT Server                (JSON data) -->
      Cloud Server
The IoT Server converts the binary data packet sent from the edge device to JSON, which is sent to the server pointed to by the Destination URL using an HTTP PUT request.
The Cloud Server can (optionally) send data back to the device as a string message in the response. The body of the response message should in this case contain JSON data in the following format:
{ "Message": "STRING DATA" }
4. Step-by-step Instructions
Tutorial Source Code
Download Communication Tutorial Source CodeThe following steps include making settings in the management console, uploading server files, and installing the application firmware on the device.
4.1. Specify the Destination URL
Open the web-based Management Console and navigate to the Settings Screen.
Enter the URL to the PHP script that will receive the data from the device.
Example:
https://mywebserver.com/server.php
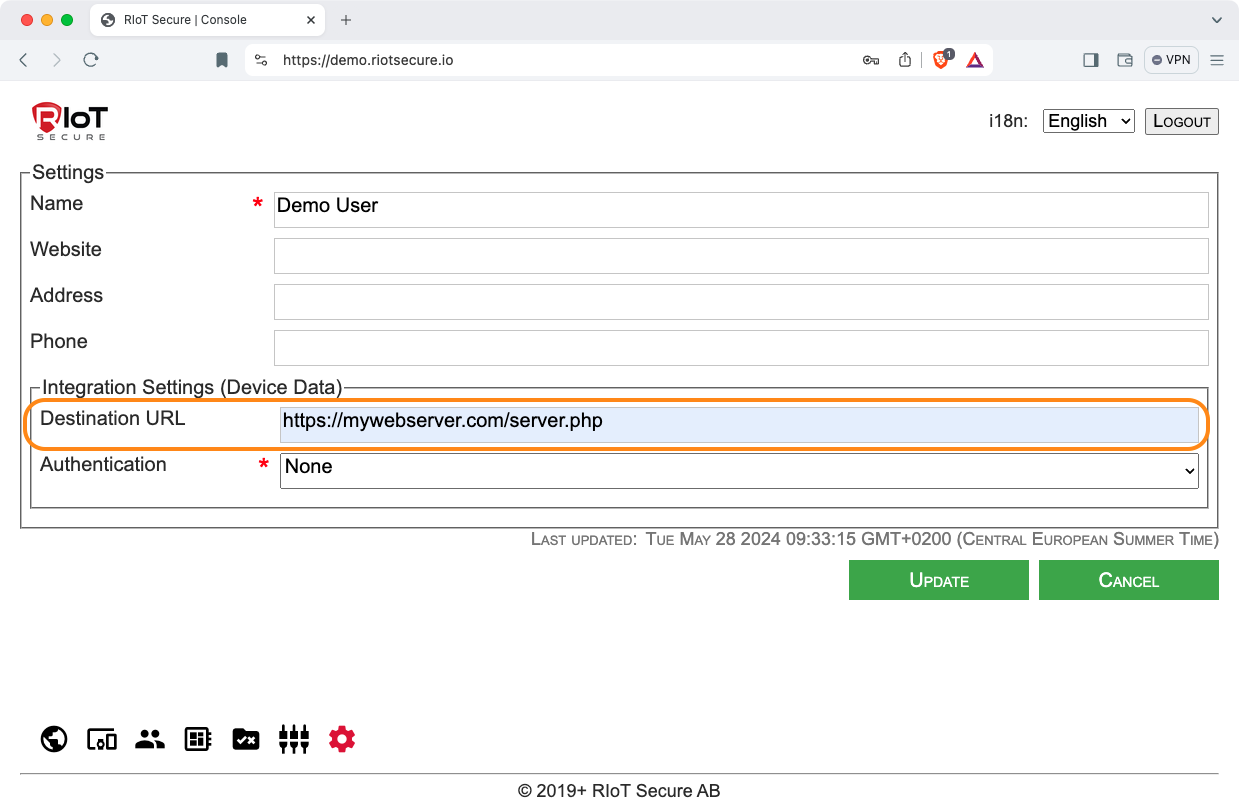
Note that the server pointed to by the Destination URL is not part of the RIoT Secure Platform; it is a separate web server managed by the customer.
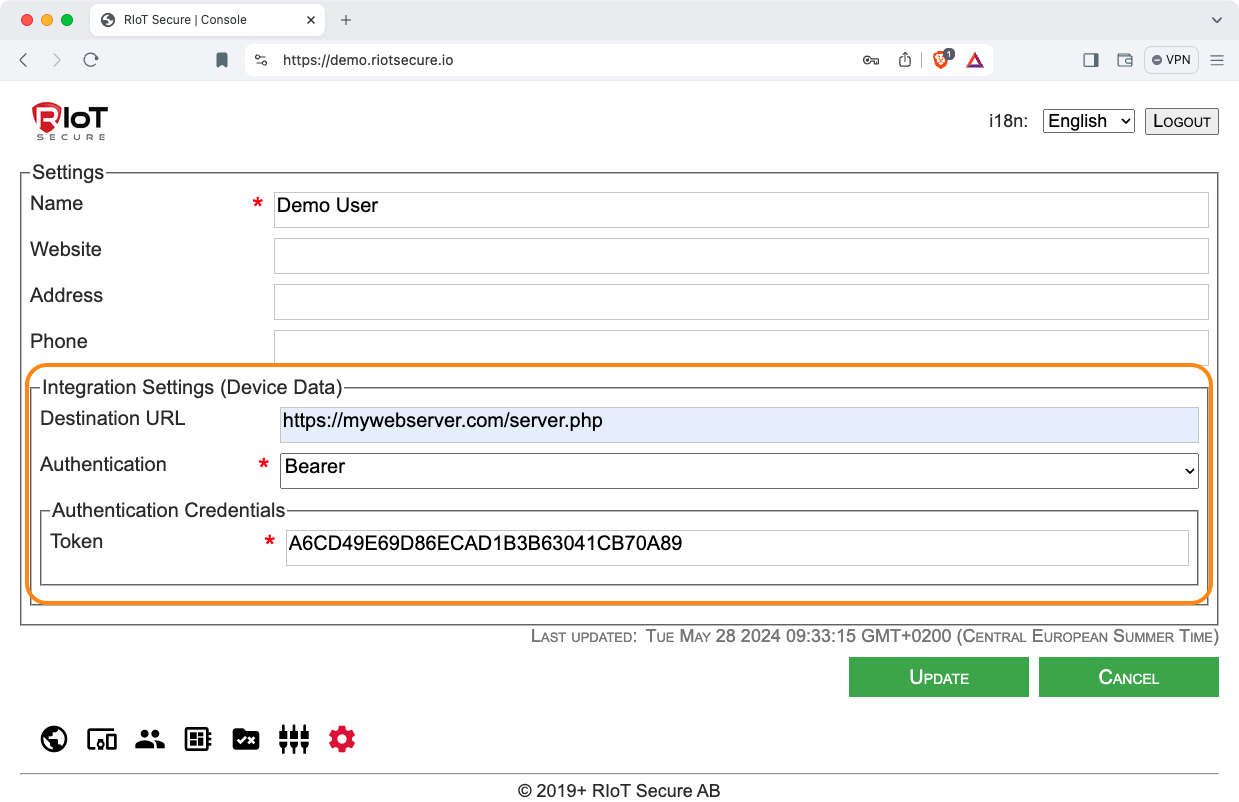
4.2. Select the Authentication Method
The RIoT Secure Platform can use different authentication methods for device to cloud communication. In customer cloud applications, it is highly recommended to use an authentication method (using method None should be avoided).
In this tutorial, Bearer authentication is used. This is a straightforward method that is easy to verify on the server side.
While the bearer token can be any string, a string composed of random letters and digits is recommended.
This screenshot shows an example of how to set the bearer token in the management console:
Edit the following section in server.php and replace YOUR-BEARER-TOKEN with the token set in the console:
// TODO: Edit code to use your bearer token
define("BEARER_TOKEN", "YOUR-BEARER-TOKEN");
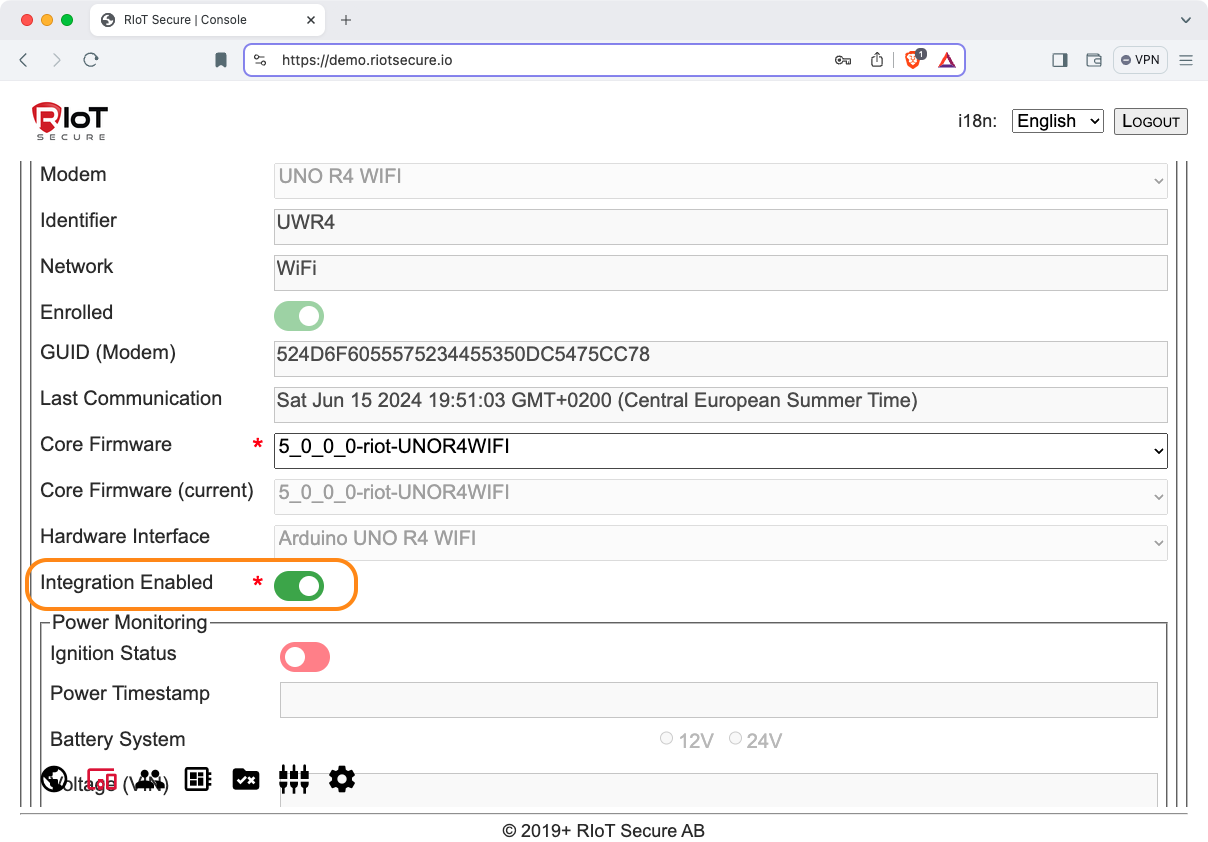
4.3. Enable Integration on the Device
Navigate to the Devices Screen in the Management Console.
Click on the entry device to edit the device.
On the Device Screen, turn on the Integration Enabled setting.
Note that this setting is per device, and is needed for each device that sends data to the cloud. If the customer cloud does not receive any data from the device, check that integration is enabled for the device.
4.4. Create the Packet Definition
Packets are created on the Packets Screen in the Management Console.
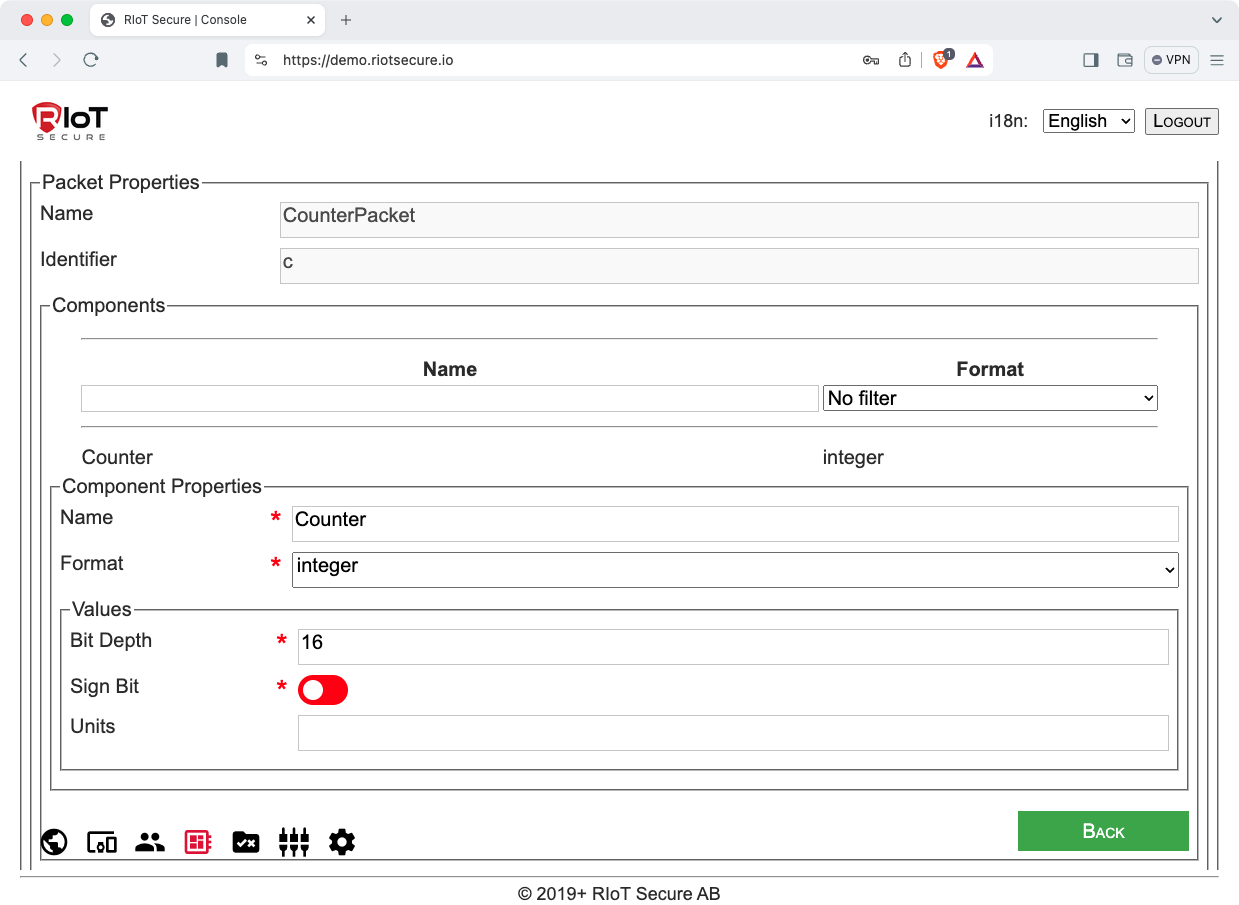
-
Log in to the RIoT Secure Management Console.
-
Navigate to the Packets Screen.
-
Create a packet with the following properties:
Name: CounterPacket
Identifier: c
Components:
  Component:
    Name: Counter
    Format: integer
    Bit Depth: 16
    Sign Bit: unchecked/empty (unsigned integer)
    Units: empty
- Save the packet definition.
Important to note in the packet definition is the identifier “c”. This is a single character identifier used in the C++ application firmware code to reference the packet format. Any single character can be used as identifier, and each packet must have a unique identifier.
4.5. Upload Server Files
Upload the following files to your web server:
server.php
server-get-counter-data.php
dashboard-counter.html
riotsecure-logo.png
4.6. Server Script
The script server.php accepts the incoming PUT request and saves the device data sent in the request body. This script saves the counter value and associated packet data to a data file stored on the server.
Importantly the server script verifies the Bearer token defined on the Setting Screen.
Click to view server.php
<?php
/*
File: server.php
Receiving script on the integration server - accepts a PUT request with JSON data.
This code is part of the communication code example RIoTCounter.

TODO: You must edit the code below to use your bearer token.
*/

// TODO: Edit code to use your bearer token
define("BEARER_TOKEN", "YOUR-BEARER-TOKEN");

// Call main function
main();

function main()
{
  // Get PUT data
  $json = file_get_contents('php://input');

  // Validate incoming request using Bearer authentication
  $success = verify_bearer(BEARER_TOKEN);
  if (!$success)
  {
    http_response_code(401);
    exit();
  }

  // Log the data
  $device_data = json_decode($json);
  $device_data = process_data($device_data);
  $result = log_data($device_data);

  // Send response to device
  $reponse_data = new stdClass();
  if (false !== $result)
  {
    $reponse_data->Message = "OK"; // OK
  }
  else
  {
    $reponse_data->Message = "ER"; // ERROR
  }

  echo json_encode($reponse_data);
}

// Function that verifies the bearer token
function verify_bearer($token)
{
  $success = false;

  $headers = apache_request_headers();

  if (array_key_exists("Authorization", $headers))
  {
    $auth = $headers["Authorization"];
    $auth_parts = explode(" ", $auth, 2);
    $success = ($auth_parts[0] === "Bearer") && ($auth_parts[1] === $token);
  }

  return $success;
}

// Process device data by adding and removing entries
function process_data($device_data)
{
  // Remove entries of less interest for this application
  unset($device_data->memory);
  unset($device_data->hardware);

  // Add server date and time
  $device_data->date = date('y-m-d H:i:s');

  // Add device id
  $device_data->device_id = device_id_from_guid($device_data->guid);

  return $device_data;
}

// JSON data is written to a log file. The format of the log file
// is a JSON array. The first element in the array is the most recent.
function log_data($device_data)
{
  // Set destination file
  $file_name = __DIR__ . "/data_counters.json";

  // Existing data array
  $log_data = [];

  // Check if file exists
  if (file_exists($file_name))
  {
    // Read file
    $json = file_get_contents($file_name);
    $log_data = json_decode($json);
  }

  // Add device data as the first element
  array_unshift($log_data, $device_data);

  // Maintain max array length
  if (count($log_data) > 20)
  {
    array_pop($log_data);
  }

  // Write file
  $json = json_encode($log_data, JSON_PRETTY_PRINT);
  $result = file_put_contents($file_name, $json, LOCK_EX);
  if (false === $result)
  {
    return false;
  }
  else
  {
    return true;
  }
}

// Extract tenant id from the GUID
function tenant_id_from_guid($guid)
{
  $bytes = str_split($guid, 2);
  $byte_0 = hexdec($bytes[0]);
  $byte_1 = hexdec($bytes[1]);
  $R = 82; //ord("R");
  $I = 73; //ord("I");
  $tenant_id = (($byte_0 ^ $R) << 8) | ($byte_1 ^ $I);

  return $tenant_id;
}

// Extract device id from the GUID
function device_id_from_guid($guid)
{
  $bytes = str_split($guid, 2);
  $byte_2 = hexdec($bytes[2]);
  $byte_3 = hexdec($bytes[3]);
  $o = 111; //ord("o");
  $T = 84;  //ord("T");
  $device_id = (($byte_2 ^ $o) << 8) | ($byte_3 ^ $T);

  return $device_id;
}
4.7. Server Data File
This script creates and updates the data_counters.json data file, which contains the recent packets received.
Here is an example that illustrates the format of the JSON packet data. Packet data is in the packets array:
{
  "guid": "524d6f724d4b527701237c774708ffdf",
  ...,
  "packets":
  [
    {
      "ts": 1699998738250,
      "CounterPacket":
      {
        "Counter": 42
      }
    }
  ]
}
The packets array contains the packets sent from the device. It can contain zero to many packets.
When having multiple devices, they will call the same Destination URL. The guid field identifies the edge device of the current message.
Note that server.php modifies the JSON data before writing it to data_counters.json. For example the device id is extracted and added to the data entry, and some unused fields are removed. This is done to simplify the Web UI component, and to reduce the amount of stored data.
To view the raw JSON data in a web browser, use a URL on this format:
https://mywebserver.com/data_counters.json
4.8. Web UI
The web app dashboard-counter.html is used for monitoring devices. It is accessed from the web browser. For example:
https://mywebserver.com/dashboard-counter.html
The Web UI can display multiple connected devices, with inactive devices grayed out. The code contains a function for simulating multiple devices.
This screenshot shows an example:
Click to view dashboard-counter.html
<!--
File: dashboard-counter.html

This code example illustrates a basic dashboard that displays devices and
their counter values. This example is part of the communication code
example RIoTCounter.

Data in file data_counters.json is fetched and used to update the dashbord
device items.

The file data_counters.json contains data for the 20 most recent device
connections. Entries are sorted with the most recent one first. The same
device may occur multiple times in the data (if there is a single active
device, all entries will belong to this device).

To test the UI with miltiple devices, this can be simulated. A function
that does this is found at the end of this file.
-->
<!DOCTYPE html>
<html>
<head>
  <meta charset="utf-8">
  <meta name="viewport" content="width=device-width, user-scalable=yes, initial-scale=1.0, shrink-to-fit=no" />
  <title>Counter Dashboard</title>
  <style>
    html
    {
      width: 100%;
      margin: 0;
      padding: 0;
      box-sizing: border-box;
    }
    *, *:before, *:after
    {
      box-sizing: inherit;
    }
    .dashboard
    {
      width: 100%;
      max-width: 600px;
      padding: 10px;
      font-family: sans-serif;
    }
    .dashboard-logo img
    {
      width: 90px;
      height: auto;
    }
    .dashboard-header
    {
      font-size: 1.8rem;
      margin: 5px 0px 20px 0px;
      padding-left: 5px;
      padding-bottom: 10px;
      border-bottom: 1px solid black;
    }
    .dashboard-card
    {
      border: 1px solid black;
      border-radius: 5px;
      padding: 20px;
      width: 100%;
      margin: 20px 0px;
    }
    .dashboard-card-gray
    {
      opacity: 0.5;
    }
    .dashboard-card-title
    {
      font-size: 1.4rem;
      margin: 0px 0px 5px 0px;
    }
    .dashboard-card-field
    {
      font-size: 1.1rem;
      margin: 5px 0px 0px 0px;
    }
    </style>
</head>

<body>
  <div class="dashboard">
    <div class="dashboard-logo"><img src="riotsecure-logo.png" /></div>
    <div class="dashboard-header">Counter Dashboard</div>
    <!--<div class="dashboard-card" id="device-52">
      <div class="dashboard-card-title">Device: <span class="field-id">52</span></div>
      <div class="dashboard-card-field">Counter: <span class="field-counter">1</span></div>
      <div class="dashboard-card-field">Last seen: <span class="field-lastseen">date</span><div>
    </div>-->
  </div>
</body>

<script>
  let Devices = {}; // Used to track seen devices
  let DeviceInactiveAfter = 60 * 1000; // One minute
  let DashboardUpdateInterval = 5000;  // 5 seconds
  let ServerURL = '/server-get-counter-data.php';

  async function fetchDataAndUpdateCards()
  {
    try
    {
      let url = ServerURL;

      // Get JSON array with entries that contain packet data
      let response = await fetch(url);
      const data = await response.json();
      //console.log(data); // debug logging

      // Update UI
      updateCards(data);
      checkInactiveDevices();

      // Fetch again after delay
      setTimeout(fetchDataAndUpdateCards, DashboardUpdateInterval);
    }
    catch (error)
    {
      console.log('Error fetching data');
      console.log(error);

      // Sometimes data with zero length is received
      // Fetch data again after delay
      setTimeout(fetchDataAndUpdateCards, DashboardUpdateInterval);
    }
  }

  function updateCards(data)
  {
    // Track seen device ids
    let seenDevices = new Set();

    // Loop through the entries update devices
    // The order of entries is the most recent ones first
    // A device can have multiple entries, we only use
    // the first entry and track devices in seenDevices.
    for (let entry of data)
    {
      // Packets arrray must not be empty
      if (Object.hasOwn(entry, 'packets') && entry.packets.length > 0)
      {
        //console.log(entry); // debug log
        // For simplicity use the first packet in the array
        // (there may be multiple packets)
        let packet = entry.packets[0];
        // It must be a CounterPacket
        if (Object.hasOwn(packet, 'CounterPacket'))
        {
          // Get the device id
          let deviceId = entry.device_id;
          // Only update if not seen
          if (!seenDevices.has(deviceId))
          {
            // Mark device as seen
            seenDevices.add(deviceId);
            // Get counter value
            let counter = packet.CounterPacket.Counter;
            // Get timestamp
            let timestamp = packet.ts;
            // Update device card
            cardAddOrUpdate(deviceId, counter, timestamp);
          }
        }
      }
    }
  }

  function checkInactiveDevices()
  {
    let now = Date.now();
    for (const [key, timestamp] of Object.entries(Devices))
    {
      if (now - timestamp > DeviceInactiveAfter)
      {
        // Not seen for X seconds, display as inactive
        let card = document.querySelector('#device-' + key);
        card.classList.add('dashboard-card-gray');
      }
    }
  }

  function cardAddOrUpdate(deviceId, counter, timestamp)
  {
    // Set last seen
    let date = new Date(timestamp).toISOString();
    let lastseen = date.substring(0, 10) + ' ' + date.substring(11, 22) + ' UTC';

    // Does a card for this device exist?
    if (Object.hasOwn(Devices, deviceId))
    {
      // Device card exists - update it
      let card = document.querySelector('#device-' + deviceId);
      let counterNode = card.querySelector('.field-counter');
      let lastSeenNode = card.querySelector('.field-lastseen');
      counterNode.textContent = counter;
      lastSeenNode.textContent = lastseen;
      card.classList.remove('dashboard-card-gray');
    }
    else
    {
      // Card does not exist - add new card for this device
      cardAdd(deviceId, counter, lastseen);
    }

    // Update timestamp for device
    Devices[deviceId] = timestamp;
  }

  function cardAdd(deviceId, counter, lastseen)
  {
    let dashboard = document.querySelector('.dashboard');
    let html = cardCreateHtml(deviceId, counter, lastseen);
    let card = document.createRange().createContextualFragment(html);
    dashboard.appendChild(card);
  }

  function cardCreateHtml(deviceId, counter, lastseen)
  {
    return `<div class="dashboard-card" id="device-${deviceId}">
      <div class="dashboard-card-title">Device: <span class="field-id">${deviceId}</span></div>
      <div class="dashboard-card-field">Counter: <span class="field-counter">${counter}</span></div>
      <div class="dashboard-card-field">Last seen: <span class="field-lastseen">${lastseen}</span><div>
    </div>`;
  }

  // Display live data
  fetchDataAndUpdateCards();

/*
  // Use the following for testing the UI with multiple simulated devices
  function testDeviceCards()
  {
    DeviceInactiveAfter = 5000;
    let counter = 1;
    function updateDeviceCards()
    {
      let deviceId = (Math.floor(Math.random() * 5)) + 42;
      let timestamp = new Date();
      ++ counter;
      cardAddOrUpdate(deviceId, counter, timestamp);
      checkInactiveDevices();
      setTimeout(updateDeviceCards, 1000);
    }
    setTimeout(updateDeviceCards, 1000);
  }

  testDeviceCards();
*/
</script>
</html>
The Web UI calls server-get-counter-data.php to fetch device data:
Click to view server-get-counter-data.php
<?php
/*
File: server-get-counter-data.php
Return device JSON data.
This code is part of the communication code example RIoTCounter.
*/

header('Access-Control-Allow-Origin: *');
echo file_get_contents('data_counters.json');
4.9. Application Firmware
The application firmware is built using the Arduino IDE.
There are two versions of the firmware code, one for Arduino Uno R4 WiFi, and one for Arduino Uno and Arduino Mega.
The difference between the two versions is that the Arduino Uno R4 WiFi sketch uses slightly different configuration options and uses the LED matrix to display device status.
File riotuart.h is identical for both sketches.
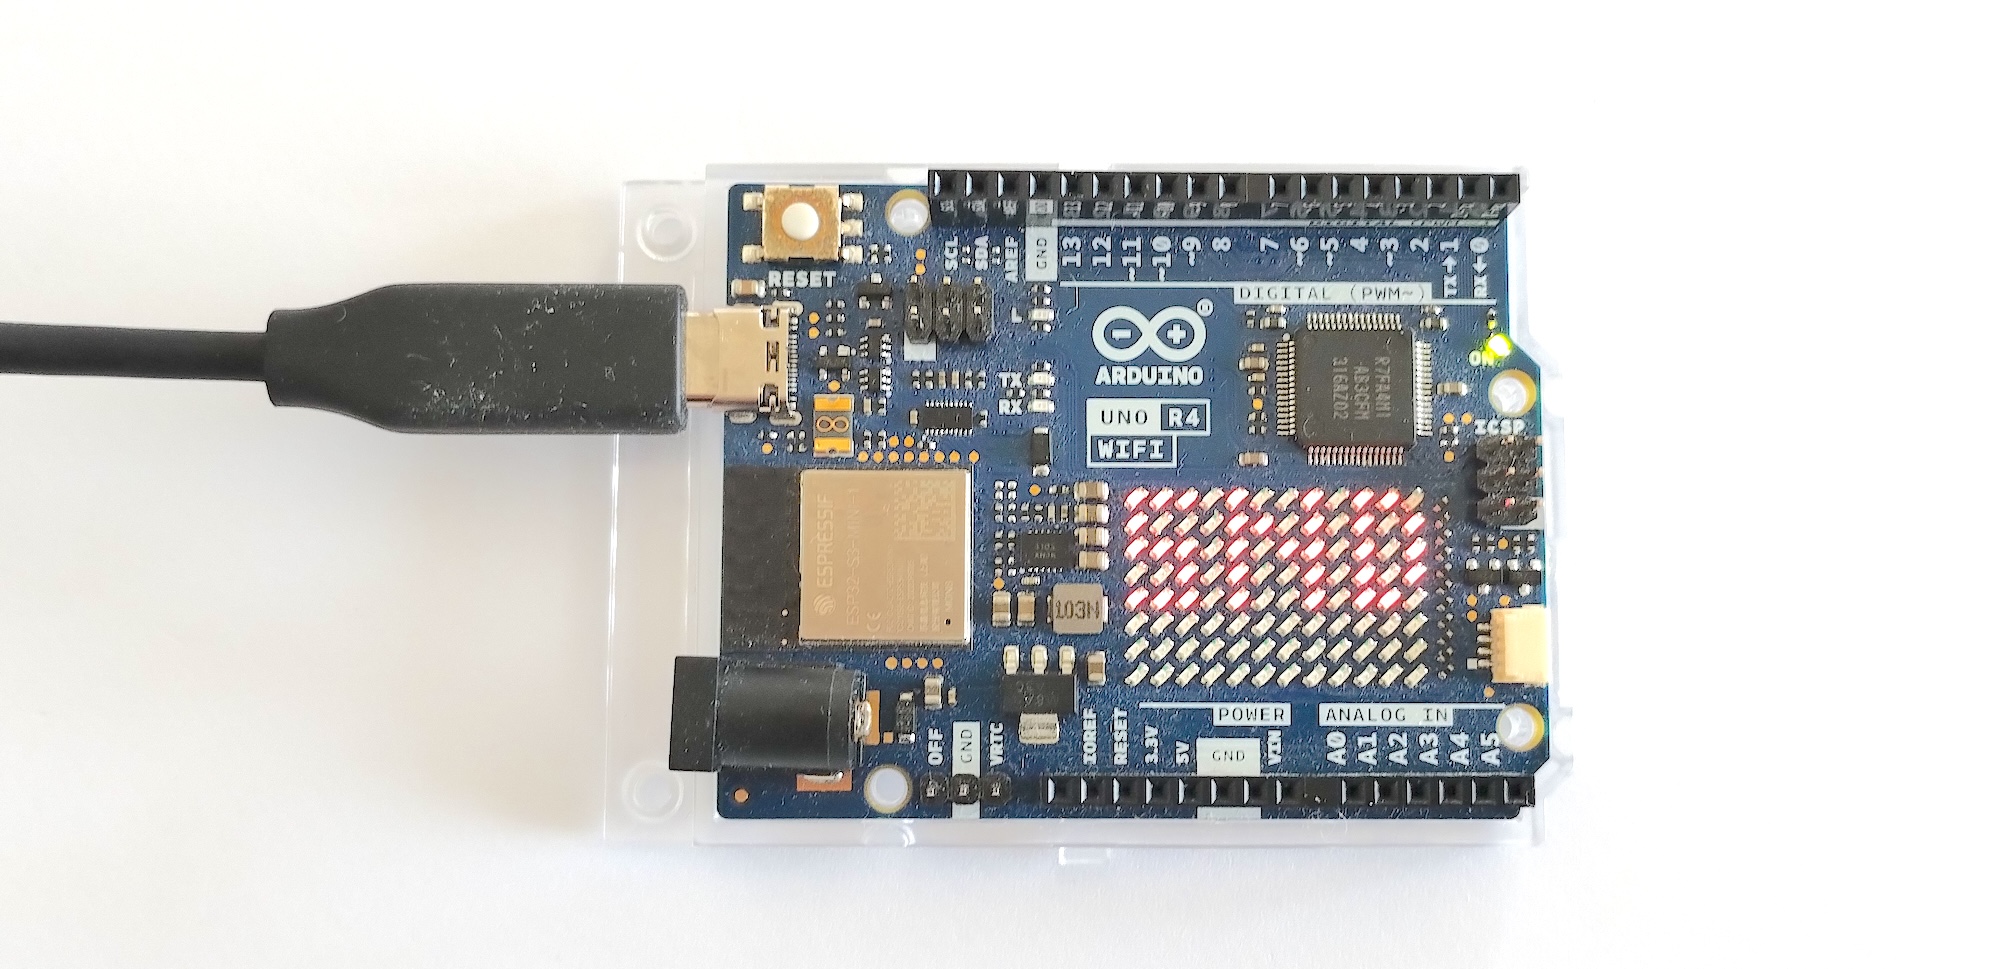
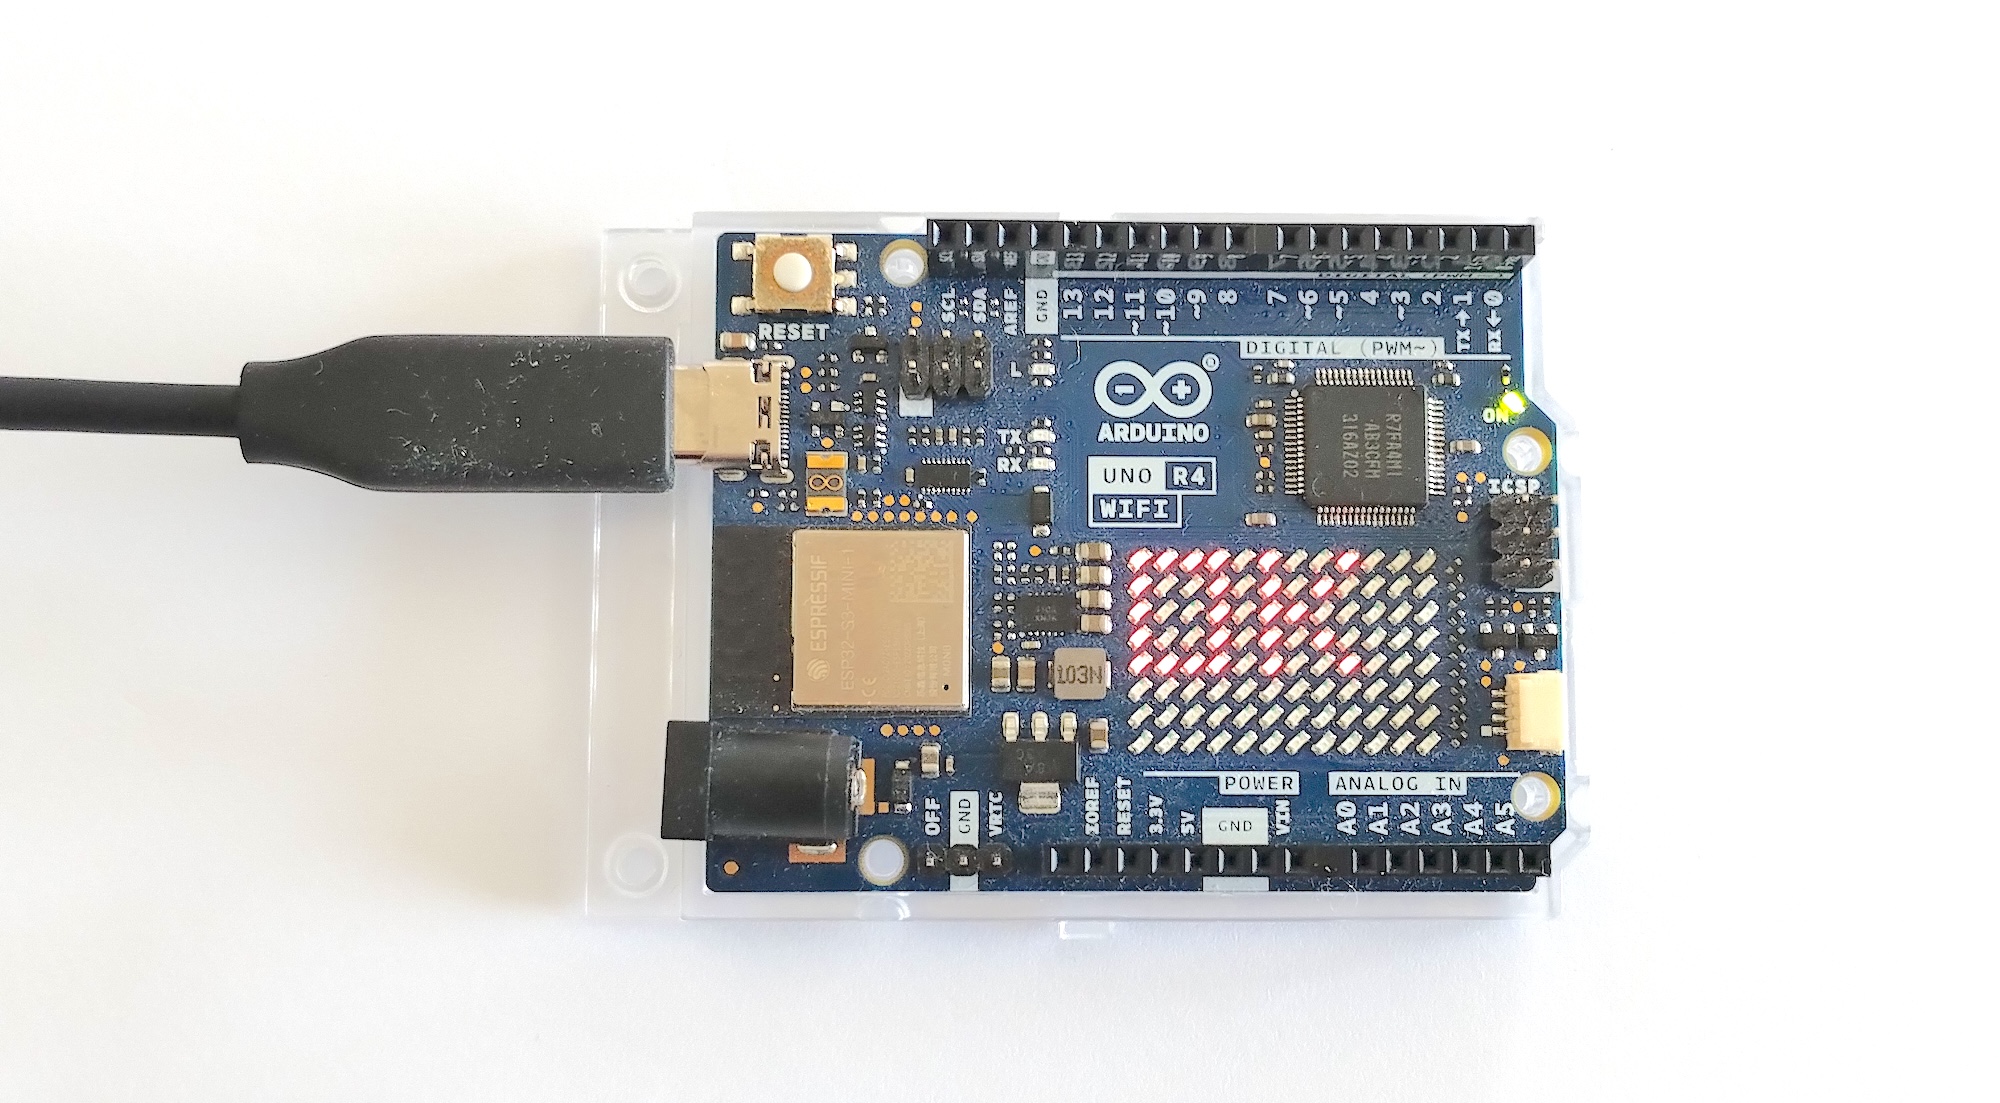
4.9.1. Arduino Uno R4 WiFi
The Arduino Uno R4 WiFi uses the LED matrix to show the device status:
- SND is shown when sending a message
- OK is shown when receiving an OK response from the server
- ER is shown when receiving an ER error response from the server
Sketch files:
CounterUnoR4/        // sketch for Arduino Uno R4 WiFi
  CounterUnoR4.ino   // main file
  application.h      // application code
  riotuart.h         // library code
Click to view CounterUnoR4.ino
/*
File: CounterUnoR4.ino
Target device: Arduino Uno R4 WiFi

Demo sketch for device to cloud communication.
The application sends a counter on a regular interval.
*/

// Include system libraries
#include <Arduino.h>
#include <SoftwareSerial.h>
#include <stdint.h>
#include <stdlib.h>

// Define this for Arduino UNO R4
#define RIOT_UART_NATIVE

// Define this for Arduino UNO/MEGA
//#define RIOT_UART_SOFTWARE

// Define serial debug output
#define ENABLE_DEBUG
// Define DEBUG_RIOT_BOARD for UNO R4
#define DEBUG_RIOT_BOARD

#ifdef ENABLE_DEBUG
  #ifdef DEBUG_RIOT_BOARD
    #define dbgRxPin 2 // green wire on TTL cable
    #define dbgTxPin 3 // white wire on TTL cable
                       // connect black wire to GND
    SoftwareSerial dbgUART(dbgRxPin, dbgTxPin);
  #else
    #define dbgUART Serial
  #endif
#endif

// Include core communication library
#include "riotuart.h"

// Include application code
#include "application.h"

void setup()
{
  #ifdef ENABLE_DEBUG
    #ifdef DEBUG_RIOT_BOARD
      pinMode(dbgRxPin, INPUT);
      pinMode(dbgTxPin, OUTPUT);
      dbgUART.begin(115200);
    #else
      dbgUART.begin(9600);
    #endif
  #endif

  // Set callback function and initialize communication
  // between the Core Firmware and the application
  riotUART.begin(application_riotuart_callback);

  // Small delay on startup
  delay(500);

  #ifdef ENABLE_DEBUG
    dbgUART.println(F("HI WORLD"));
  #endif

  // Wait for a message from the Core Firmware before processing data
  //g_application_status = APP_STATE_IDLE;
}

void loop()
{
  // Handle any communication between the Core Firmware and the application
  riotUART.loop();

  // Process application state machine
  if (g_application_status != APP_STATE_IDLE)
  {
    switch (g_application_status)
    {
      case APP_STATE_INIT:
        #ifdef ENABLE_DEBUG
          dbgUART.println(F("APP_STATE_INIT"));
        #endif
        application_init();
        g_application_status = APP_STATE_LOOP;
        break;

      case APP_STATE_LOOP:
        application_loop();
        break;

      case APP_STATE_QUIT:
        application_quit();
        #ifdef ENABLE_DEBUG
          dbgUART.println(F("APP_STATE_QUIT"));
        #endif
        g_application_status = APP_STATE_IDLE;
        break;
    }
  }
}
Click to view application.h
/*
File: application.h

Handle communication with the customer cloud.

A counter value is used as example data.
*/

#ifndef APPLICATION_H
#define APPLICATION_H

// LED matrix library
#include "Arduino_LED_Matrix.h"

// Create matrix object
ArduinoLEDMatrix g_led_matrix;

// LED matrix screens
const uint32_t g_matrix_send[]  = { 0xe968d5eb, 0x5295e960, 0x0, 66 };
const uint32_t g_matrix_ok[]    = { 0xf4895096, 0x950f480, 0x0, 66 };
const uint32_t g_matrix_er[]    = { 0xf70848f7, 0x8850f480, 0x0, 66 };
//const uint32_t g_matrix_blank[] = { 0x0, 0x0, 0x0, 66 };

// Constants
#define       MESSAGE_INTERVAL         15000 // millisecond interval
#define       MESSAGE_PACKET_SIZE      5     // size of counter packet
#define       GPS_MESSAGE_PACKET_SIZE  19    // size of predefined GPS packet

// Global variables
unsigned long g_timer;
unsigned int  g_counter;
uint8_t       g_message[MESSAGE_PACKET_SIZE];
char          g_inbuf[64];

void send_counter()
{
  g_led_matrix.loadFrame(g_matrix_send);

  uint16_t value = (uint16_t) g_counter;

  g_message[0] = '*'; // * = high priority,  # = normal priority
  g_message[1] = 'c'; // packet id
  g_message[2] = 2;   // data length in bytes
  g_message[3] = 0xFF & (value >> 8);
  g_message[4] = 0xFF & (value);

  // Queue message for sending to server
  riotUART.queue(g_message, 0, MESSAGE_PACKET_SIZE);

  #ifdef ENABLE_DEBUG
    dbgUART.print(F("SEND COUNTER: "));
    dbgUART.println(value);
  #endif
}

void application_init()
{
  #ifdef ENABLE_DEBUG
    dbgUART.println(F("APPLICATION INIT"));
    dbgUART.print(F("MESSAGE INTERVAL: "));
    dbgUART.println(MESSAGE_INTERVAL);
  #endif

  // Initialize LED matrix
  g_led_matrix.begin();
  //g_led_matrix.loadFrame(g_matrix_blank);

  // Set initial counter
  g_counter = 0;

  // Set timestamp for send timer
  g_timer = millis();
}

void application_loop()
{
  // Send counter to server on MESSAGE_INTERVAL
  unsigned long now = millis();
  if ((g_timer + MESSAGE_INTERVAL) < now)
  {
    // Increment and send counter value
    g_counter += 1;
    send_counter();

    // Update interval timestamp
    g_timer = millis();
  }
}

// Callback function that handles messages from the Core Firmware
void application_riotuart_callback(uint8_t *rx, size_t len)
{
  // Check packet message format
  if (rx[0] == '#') // # means incoming data packet
  {
    switch (rx[1])
    {
      case '+':
        // Check if valid GPS packet and handle data
        if (len == GPS_MESSAGE_PACKET_SIZE)
        {
          // Process GPS data and send to cloud server
          // (optional, not handled in this example)
        }
        break;

      default:
        break;
    }
  }
  else
  // Handle string data sent from the cloud server
  {
    // Save string data to a buffer
    int length = len < sizeof(g_inbuf) ? len : sizeof(g_inbuf);
    memcpy(g_inbuf, rx, length);
    g_inbuf[length] = 0;

    // Update LED matrix display
    if (0 == strcmp(g_inbuf, "OK"))
    {
      g_led_matrix.loadFrame(g_matrix_ok);
    }
    else
    {
      g_led_matrix.loadFrame(g_matrix_er);
    }

    #ifdef ENABLE_DEBUG
      dbgUART.print(F("INCOMING DATA LENGTH: "));
      dbgUART.println(len);
      dbgUART.println(g_inbuf);
    #endif
  }
}

void application_quit()
{
  // Shutdown sub-systems as needed
}

#endif
Click to view riotuart.h
//--------------------------------------------------------------------------
// @riotuart.h
//
// (c) RIoT Secure AB
//--------------------------------------------------------------------------

//--------------------------------------------------------------------------
// DEVELOPER WARNING
//
// do not modify the source code in any way - it is coded specifically to
// interface with the RIoTClient for the exchange of messages to and from
// the microcontroller, local modem level services and internet services.
//
// RIoTUART communication is restricted to send up to 255 bytes of data
// at a time (len is defined as a uint8_t within the communication protocol)
// the communication protocol is as follows, the code provided implements
// the receival and sending of data over a UART confirming to the protocol.
//
//   0x02 LEN { DATA } CS 0x03
//
//--------------------------------------------------------------------------

#ifndef RIOTUART_H
#define RIOTUART_H

#if   !defined(RIOT_UART_NATIVE) && !defined(RIOT_UART_SOFTWARE)
#error "RIoTUART - must define either RIOT_SERIAL_NATIVE or RIOT_SERIAL_SERIAL"
#elif  defined(RIOT_UART_NATIVE) && defined(RIOT_UART_SOFTWARE)
#error "RIoTUART - cannot define both RIOT_SERIAL_NATIVE or RIOT_SERIAL_SOFTWARE together"
#endif

#define CORE_SER_MAX_DATA_LEN 256
#define CORE_SER_RX_BUF_SIZE  (CORE_SER_MAX_DATA_LEN + 2)  //          { DATA } CS 0x03 - 2 extra bytes
#define CORE_SER_TX_BUF_SIZE  (CORE_SER_MAX_DATA_LEN + 4)  // 0x02 LEN { DATA } CS 0x03 - 4 extra bytes

//--------------------------------------------------------------------------
// globals
//--------------------------------------------------------------------------

int8_t  g_application_status;

#define APP_STATE_IDLE               0
#define APP_STATE_INIT               1
#define APP_STATE_LOOP               2
#define APP_STATE_QUIT               3

// SerialX is using the standard Serial UART
#ifdef RIOT_UART_NATIVE
#define SerialX Serial
#endif

// SerialX is using a SoftwareSerial UART using custom pins
#ifdef RIOT_UART_SOFTWARE
#define serialXRxPin MOSI
#define serialXTxPin MISO
SoftwareSerial SerialX(serialXRxPin, serialXTxPin);
#endif

typedef void (*RIoTUARTCallback)(uint8_t *buf, size_t len);

class RIoTUART
{
  public:
    void     begin(RIoTUARTCallback callback);
    void     loop();
    bool     queue(uint8_t *buf, size_t ofs, size_t len);
    void     end();

  private:

    // our receive buffer
    bool     rx_start;
    uint8_t  rx_buf[CORE_SER_RX_BUF_SIZE];
    size_t   rx_buf_idx;
    size_t   rx_len;
    uint8_t  rx_cs;

    // our transmit buffer
    uint8_t  tx_buf[CORE_SER_TX_BUF_SIZE];
    size_t   tx_buf_idx;
    size_t   tx_len;
    uint8_t  tx_cs;

    RIoTUARTCallback callback;
};

// there should only be one instance of RIoTUART defined
RIoTUART riotUART;

//--------------------------------------------------------------------------
// implementation
//--------------------------------------------------------------------------

// void
// RIoTUART::begin(RIoTUARTCallback callback)
//
// initialize the connection between the RIoTClient and the application.
// this should be placed in the setup() function of the main sketch
//
// @param callback: function pointer - executed on receival of a data packet
// @return none

void
RIoTUART::begin(RIoTUARTCallback callback)
{
  // initialize the serial connection to RIoT Fusion
#ifdef RIOT_UART_SOFTWARE
  pinMode(serialXRxPin, INPUT);
  pinMode(serialXTxPin, OUTPUT);
#endif
  SerialX.begin(57600);

  // initialize buffers
  memset(this->rx_buf, 0, CORE_SER_RX_BUF_SIZE);
  this->rx_start   = false;
  this->rx_buf_idx = 0;
  this->rx_len     = 0x100; // impossible value

  // initialize buffers - for sending data
  memset(this->tx_buf, 0, CORE_SER_TX_BUF_SIZE);
  this->tx_buf_idx = 2;
  this->tx_buf[0]  = 0x02; // STX
  this->tx_buf[1]  = 0x00; // len (to be provided later)

  // register the callback when data is received
  this->callback = callback;
}

// void
// RIoTUART::loop()
//
// maintain connection with RIoTUART, recieve and send messages from
// to allow communication betwenthe RIoTClient and the application.
// this should be placed in the loop() function of the main sketch
// user derived code in should not block code execution; or the UART
// connection may not be maintained and will prevent exchange of data
//
// @param  none
// @return none

void
RIoTUART::loop()
{
  //
  // RECEIVING - attempt to receive a whole message if possible
  //

  // does any data exist on the serial UART?
  while (SerialX.available())
  {
    // read the character from the UART
    uint8_t c = (uint8_t)SerialX.read();
    switch (c)
    {
      // STX
      case 0x02:
           // if no packet defined yet - great, we may have one
           if (!this->rx_start && (this->rx_len == 0x100))
           {
             this->rx_buf_idx = 0;
             this->rx_start   = true;  // ok; we now have a packet
           }

           // if the packet is started, the 0x02 is part of the packet
           else
           {
             // store the 0x02 in the receive buffer
             goto riotuart_loop_store;
           }
           break;

      // ETX
      case 0x03:
           // packet hasn't started - ignore data until STX received
           if (this->rx_len != 0x100)
           {
             // if the packet is started, the 0x03 may be part of the packet
             if (this->rx_buf_idx < (this->rx_len+1))
             {
               // store the 0x03 in the receive buffer
               goto riotuart_loop_store;
             }
             else

             // if we have received all data - the end of the message
             {
               // calculate the checksum (excluding CS itself)
               this->rx_cs = 0;
               for (size_t i=0; i<this->rx_len; i++)
                 this->rx_cs ^= this->rx_buf[i];

               // does the checksum match (ensure type == same)
               if (this->rx_cs == this->rx_buf[this->rx_len])
               {
#if defined(ENABLE_DEBUG)
                 // debugging purposes
                 dbgUART.println(":: recv");
                 dbgUART.print("length:     ");
                 dbgUART.println(this->rx_len);
                 dbgUART.print("checksum:   0x");
                 c = this->rx_cs;
                 if (c < 16) dbgUART.write('0');
                 dbgUART.println(c, HEX);
                 dbgUART.print("recv (HEX): ");
                 for (size_t i=0;i<this->rx_len; i++)
                 {
                   c = this->rx_buf[i];
                   if (c < 16) dbgUART.write('0');
                   dbgUART.print(c, HEX);
                   if (i != (this->rx_len-1)) dbgUART.write(' ');
                 }
                 dbgUART.println();
                 dbgUART.print("recv (ASC): ");
                 for (size_t i=0; i<this->rx_len; i++)
                 {
                   c  = this->rx_buf[i];
                   if ((c >= 0x20) && (c < 0x7f)) dbgUART.write(c);
                   else                           dbgUART.write('.');
                 }
                 dbgUART.println();
                 dbgUART.flush();
#endif

                 //
                 // MICROCONTROLLER CONTROL
                 //

                 // START
                 if (strncmp((char *)this->rx_buf, "START", 5) == 0)
                 {
                   g_application_status = APP_STATE_INIT;
                 }
                 else

                 // FINISH
                 if (strncmp((char *)this->rx_buf, "FINISH", 6) == 0)
                 {
                   g_application_status = APP_STATE_QUIT;
                 }
                 else

                 //
                 // OTHER MESSAGES - WHILE RUNNING
                 //

                 // we only process messages if the application is running
                 if (g_application_status == APP_STATE_LOOP)
                 {
                   this->callback(this->rx_buf, this->rx_len);
                 }
                 else

                 // not started and receiving messages already - initialize
                 {
                   g_application_status = APP_STATE_INIT;
                 }

                 // prepare for a new message to be received
                 this->rx_start   = false;
                 memset(this->rx_buf, 0, CORE_SER_RX_BUF_SIZE);
                 this->rx_buf_idx = 0;
                 this->rx_len     = 0x100; // impossible value
               }
               else
               {
#if defined(ENABLE_DEBUG)
                 dbgUART.println(":: RIoTUART.recv - message checksum mismatch");
#endif
               }
             }
           }

           // we are done; move along to next message
           goto riotuart_loop_recv_done;

      default:

riotuart_loop_store:;

           // start of packet? first byte is length
           if (this->rx_start)
           {
             this->rx_start = false;
             this->rx_len   = c;
           }
           else

           // packet hasn't started - ignore data
           if (this->rx_len != 0x100)
           {
             // store the value
             this->rx_buf[this->rx_buf_idx++] = c;

             // have we received too many bytes? malformed packet or bogus?
             if (this->rx_buf_idx > (this->rx_len+2))
             {
#if defined(ENABLE_DEBUG)
               // debugging purposes
               dbgUART.println(":: RIoTUART.recv - rx buffer overflow");
#endif

               // prepare for a new message to be received
               this->rx_start   = false;
               memset(this->rx_buf, 0, CORE_SER_RX_BUF_SIZE);
               this->rx_buf_idx = 0;
               this->rx_len     = 0x100; // impossible value

               // we are done; move along to next message
               goto riotuart_loop_recv_done;
             }
           }
           break;
    }
  }

riotuart_loop_recv_done:;

  //
  // SENDING - if the developer has queued up any messages, send them
  //

  // do we have anything to send?
  if ((this->tx_buf_idx > 2) && (this->tx_buf_idx < 257))
  {
    // we now know the length of our packet
    this->tx_len    = this->tx_buf_idx-2;
    this->tx_buf[1] = this->tx_len;

    // calculate the checksum of the entire message
    this->tx_cs = 0;
    for (size_t i=0; i<this->tx_len; i++)
      this->tx_cs ^= this->tx_buf[i+2];

    // and now we know the checksum
    this->tx_buf[this->tx_len+2] = this->tx_cs;
    this->tx_buf[this->tx_len+3] = 0x03; // ETX

#if defined(ENABLE_DEBUG)
    uint8_t c;

    dbgUART.println(F(":: send"));
    dbgUART.print(F("length:     "));
    dbgUART.println(this->tx_len);
    dbgUART.print(F("checksum:   0x"));
    c = this->tx_cs;
    if (c < 16) dbgUART.print(F("0"));
    dbgUART.println(c, HEX);
    dbgUART.print(F("send (HEX): "));
    for (size_t i=0;i<this->tx_len; i++)
    {
      c = this->tx_buf[i+2];
      if (c < 16) dbgUART.write('0');
      dbgUART.print(c, HEX);
      if (i != (this->tx_len-1)) dbgUART.write(' ');
    }
    dbgUART.println();
    dbgUART.print(F("send (ASC): "));
    for (size_t i=0; i<this->tx_len; i++)
    {
      c = this->tx_buf[i+2];
      if ((c >= 0x20) && (c < 0x7f)) dbgUART.write(c);
      else                           dbgUART.write('.');
    }
    dbgUART.println();
#endif

    // 0x02 LEN { DATA } CS 0x03
    SerialX.write(this->tx_buf, this->tx_len+4);
    SerialX.flush();

    // initialize buffers - for sending data
    memset(this->tx_buf, 0, CORE_SER_TX_BUF_SIZE);
    this->tx_buf_idx = 2;
    this->tx_buf[0]  = 0x02; // STX
    this->tx_buf[1]  = 0x00; // len (to be provided later)
  }
}

// void
// RIoTUART::queue(uint8_t *buf, size_t ofs, size_t len)
//
// queue a message into the RIoTUART that will be sent during the
// subequence maintenance handler of the RIoTUART connection.
//
// @param  buf - a pointer to the buffer to send
// @param  ofs - the offet within the buffer to retrieve bytes
// @param  len - the number of bytes to queue
// @return true on success, false if buffer is full
//
// EXAMPLE USAGE:
//
// {
//   if (riotUART.queue(rx, len)) // success
//   else { }                     // failure, buffer full
// }

bool
RIoTUART::queue(uint8_t *buf, size_t ofs, size_t len)
{
  bool success = false;

  // do we have room for the message in the tx buffer?
  if ((this->tx_buf_idx + len) < (CORE_SER_TX_BUF_SIZE-4))
  {
    // insert the message into the queue
    memcpy(&this->tx_buf[this->tx_buf_idx], &buf[ofs], len);
    this->tx_buf_idx += len;

    // inform the developer the message was queued successfully
    success = true;
  }

  return success;
}

// void
// RIoTUART::end()
//
// terminate the connection between the RIoTClient and the application.
//
// @param  none
// @return none

void
RIoTUART::end()
{
  // terminate the serial connection to RIoT Fusion
  SerialX.end();
#ifdef RIOT_UART_SOFTWARE
  pinMode(serialXRxPin, INPUT);
  pinMode(serialXTxPin, INPUT);
#endif
}

#endif

//--------------------------------------------------------------------------
4.9.2. Arduino Uno and Arduino Mega
Sketch files (works with both Uno and Mega):
CounterUnoMega/      // sketch for Arduino Uno and Arduino Mega
  CounterUnoMega.ino // main file
  application.h      // application code
  riotuart.h         // library code
Click to view CounterUnoMega.ino
/*
File: CounterUnoMega.ino
Target device: Arduino Uno and Arduino Mega

Demo sketch for device to cloud communication.
The application sends a counter on a regular interval.
*/

// Include system libraries
#include <Arduino.h>
#include <SoftwareSerial.h>
#include <stdint.h>
#include <stdlib.h>

// Define this for Arduino UNO R4
//#define RIOT_UART_NATIVE

// Define this for Arduino UNO/MEGA
#define RIOT_UART_SOFTWARE

// Define serial debug output
#define ENABLE_DEBUG
// Define DEBUG_RIOT_BOARD for UNO R4
//#define DEBUG_RIOT_BOARD

#ifdef ENABLE_DEBUG
  #ifdef DEBUG_RIOT_BOARD
    #define dbgRxPin 2 // green wire on TTL cable
    #define dbgTxPin 3 // white wire on TTL cable
                       // connect black wire to GND
    SoftwareSerial dbgUART(dbgRxPin, dbgTxPin);
  #else
    #define dbgUART Serial
  #endif
#endif

// Include core communication library
#include "riotuart.h"

// Include application code
#include "application.h"

void setup()
{
  #ifdef ENABLE_DEBUG
    #ifdef DEBUG_RIOT_BOARD
      pinMode(dbgRxPin, INPUT);
      pinMode(dbgTxPin, OUTPUT);
      dbgUART.begin(115200);
    #else
      dbgUART.begin(9600);
    #endif
  #endif

  // Set callback function and initialize communication
  // between the Core Firmware and the application
  riotUART.begin(application_riotuart_callback);

  // Small delay on startup
  delay(500);

  #ifdef ENABLE_DEBUG
    dbgUART.println(F("HI WORLD"));
  #endif

  // Wait for a message from the Core Firmware before processing data
  //g_application_status = APP_STATE_IDLE;
}

void loop()
{
  // Handle any communication between the Core Firmware and the application
  riotUART.loop();

  // Process application state machine
  if (g_application_status != APP_STATE_IDLE)
  {
    switch (g_application_status)
    {
      case APP_STATE_INIT:
        #ifdef ENABLE_DEBUG
          dbgUART.println(F("APP_STATE_INIT"));
        #endif
        application_init();
        g_application_status = APP_STATE_LOOP;
        break;

      case APP_STATE_LOOP:
        application_loop();
        break;

      case APP_STATE_QUIT:
        application_quit();
        #ifdef ENABLE_DEBUG
          dbgUART.println(F("APP_STATE_QUIT"));
        #endif
        g_application_status = APP_STATE_IDLE;
        break;
    }
  }
}
Click to view application.h
/*
File: application.h

Handle communication with the customer cloud.

A counter value is used as example data.
*/

#ifndef APPLICATION_H
#define APPLICATION_H

// Constants
#define       MESSAGE_INTERVAL         15000 // millisecond interval
#define       MESSAGE_PACKET_SIZE      5     // size of counter packet
#define       GPS_MESSAGE_PACKET_SIZE  19    // size of predefined GPS packet

// Global variables
unsigned long g_timer;
unsigned int  g_counter;
uint8_t       g_message[MESSAGE_PACKET_SIZE];
char          g_inbuf[64];

void send_counter()
{
  uint16_t value = (uint16_t) g_counter;

  g_message[0] = '*'; // * = high priority,  # = normal priority
  g_message[1] = 'c'; // packet id
  g_message[2] = 2;   // data length in bytes
  g_message[3] = 0xFF & (value >> 8);
  g_message[4] = 0xFF & (value);

  // Queue message for sending to server
  riotUART.queue(g_message, 0, MESSAGE_PACKET_SIZE);

  #ifdef ENABLE_DEBUG
    dbgUART.print(F("SEND COUNTER: "));
    dbgUART.println(value);
  #endif
}

void application_init()
{
  #ifdef ENABLE_DEBUG
    dbgUART.println(F("APPLICATION INIT"));
    dbgUART.print(F("MESSAGE INTERVAL: "));
    dbgUART.println(MESSAGE_INTERVAL);
  #endif

  // Set initial counter
  g_counter = 0;

  // Set timestamp for send timer
  g_timer = millis();
}

void application_loop()
{
  // Send counter to server on MESSAGE_INTERVAL
  unsigned long now = millis();
  if ((g_timer + MESSAGE_INTERVAL) < now)
  {
    // Increment and send counter value
    g_counter += 1;
    send_counter();

    // Update interval timestamp
    g_timer = millis();
  }
}

// Callback function that handles messages from the Core Firmware
void application_riotuart_callback(uint8_t *rx, size_t len)
{
  // Check packet message format
  if (rx[0] == '#') // # means incoming data packet
  {
    switch (rx[1])
    {
      case '+':
        // Check if valid GPS packet and handle data
        if (len == GPS_MESSAGE_PACKET_SIZE)
        {
          // Process GPS data and send to cloud server
          // (optional, not handled in this example)
        }
        break;

      default:
        break;
    }
  }
  else
  // Handle string data sent from the cloud server
  {
    // Save string data to a buffer
    int length = len < sizeof(g_inbuf) ? len : sizeof(g_inbuf);
    memcpy(g_inbuf, rx, length);
    g_inbuf[length] = 0;

    #ifdef ENABLE_DEBUG
      dbgUART.print(F("INCOMING DATA LENGTH: "));
      dbgUART.println(len);
      dbgUART.println(g_inbuf);
    #endif
  }
}

void application_quit()
{
  // Shutdown sub-systems as needed
}

#endif
Click to view riotuart.h
//--------------------------------------------------------------------------
// @riotuart.h
//
// (c) RIoT Secure AB
//--------------------------------------------------------------------------

//--------------------------------------------------------------------------
// DEVELOPER WARNING
//
// do not modify the source code in any way - it is coded specifically to
// interface with the RIoTClient for the exchange of messages to and from
// the microcontroller, local modem level services and internet services.
//
// RIoTUART communication is restricted to send up to 255 bytes of data
// at a time (len is defined as a uint8_t within the communication protocol)
// the communication protocol is as follows, the code provided implements
// the receival and sending of data over a UART confirming to the protocol.
//
//   0x02 LEN { DATA } CS 0x03
//
//--------------------------------------------------------------------------

#ifndef RIOTUART_H
#define RIOTUART_H

#if   !defined(RIOT_UART_NATIVE) && !defined(RIOT_UART_SOFTWARE)
#error "RIoTUART - must define either RIOT_SERIAL_NATIVE or RIOT_SERIAL_SERIAL"
#elif  defined(RIOT_UART_NATIVE) && defined(RIOT_UART_SOFTWARE)
#error "RIoTUART - cannot define both RIOT_SERIAL_NATIVE or RIOT_SERIAL_SOFTWARE together"
#endif

#define CORE_SER_MAX_DATA_LEN 256
#define CORE_SER_RX_BUF_SIZE  (CORE_SER_MAX_DATA_LEN + 2)  //          { DATA } CS 0x03 - 2 extra bytes
#define CORE_SER_TX_BUF_SIZE  (CORE_SER_MAX_DATA_LEN + 4)  // 0x02 LEN { DATA } CS 0x03 - 4 extra bytes

//--------------------------------------------------------------------------
// globals
//--------------------------------------------------------------------------

int8_t  g_application_status;

#define APP_STATE_IDLE               0
#define APP_STATE_INIT               1
#define APP_STATE_LOOP               2
#define APP_STATE_QUIT               3

// SerialX is using the standard Serial UART
#ifdef RIOT_UART_NATIVE
#define SerialX Serial
#endif

// SerialX is using a SoftwareSerial UART using custom pins
#ifdef RIOT_UART_SOFTWARE
#define serialXRxPin MOSI
#define serialXTxPin MISO
SoftwareSerial SerialX(serialXRxPin, serialXTxPin);
#endif

typedef void (*RIoTUARTCallback)(uint8_t *buf, size_t len);

class RIoTUART
{
  public:
    void     begin(RIoTUARTCallback callback);
    void     loop();
    bool     queue(uint8_t *buf, size_t ofs, size_t len);
    void     end();

  private:

    // our receive buffer
    bool     rx_start;
    uint8_t  rx_buf[CORE_SER_RX_BUF_SIZE];
    size_t   rx_buf_idx;
    size_t   rx_len;
    uint8_t  rx_cs;

    // our transmit buffer
    uint8_t  tx_buf[CORE_SER_TX_BUF_SIZE];
    size_t   tx_buf_idx;
    size_t   tx_len;
    uint8_t  tx_cs;

    RIoTUARTCallback callback;
};

// there should only be one instance of RIoTUART defined
RIoTUART riotUART;

//--------------------------------------------------------------------------
// implementation
//--------------------------------------------------------------------------

// void
// RIoTUART::begin(RIoTUARTCallback callback)
//
// initialize the connection between the RIoTClient and the application.
// this should be placed in the setup() function of the main sketch
//
// @param callback: function pointer - executed on receival of a data packet
// @return none

void
RIoTUART::begin(RIoTUARTCallback callback)
{
  // initialize the serial connection to RIoT Fusion
#ifdef RIOT_UART_SOFTWARE
  pinMode(serialXRxPin, INPUT);
  pinMode(serialXTxPin, OUTPUT);
#endif
  SerialX.begin(57600);

  // initialize buffers
  memset(this->rx_buf, 0, CORE_SER_RX_BUF_SIZE);
  this->rx_start   = false;
  this->rx_buf_idx = 0;
  this->rx_len     = 0x100; // impossible value

  // initialize buffers - for sending data
  memset(this->tx_buf, 0, CORE_SER_TX_BUF_SIZE);
  this->tx_buf_idx = 2;
  this->tx_buf[0]  = 0x02; // STX
  this->tx_buf[1]  = 0x00; // len (to be provided later)

  // register the callback when data is received
  this->callback = callback;
}

// void
// RIoTUART::loop()
//
// maintain connection with RIoTUART, recieve and send messages from
// to allow communication betwenthe RIoTClient and the application.
// this should be placed in the loop() function of the main sketch
// user derived code in should not block code execution; or the UART
// connection may not be maintained and will prevent exchange of data
//
// @param  none
// @return none

void
RIoTUART::loop()
{
  //
  // RECEIVING - attempt to receive a whole message if possible
  //

  // does any data exist on the serial UART?
  while (SerialX.available())
  {
    // read the character from the UART
    uint8_t c = (uint8_t)SerialX.read();
    switch (c)
    {
      // STX
      case 0x02:
           // if no packet defined yet - great, we may have one
           if (!this->rx_start && (this->rx_len == 0x100))
           {
             this->rx_buf_idx = 0;
             this->rx_start   = true;  // ok; we now have a packet
           }

           // if the packet is started, the 0x02 is part of the packet
           else
           {
             // store the 0x02 in the receive buffer
             goto riotuart_loop_store;
           }
           break;

      // ETX
      case 0x03:
           // packet hasn't started - ignore data until STX received
           if (this->rx_len != 0x100)
           {
             // if the packet is started, the 0x03 may be part of the packet
             if (this->rx_buf_idx < (this->rx_len+1))
             {
               // store the 0x03 in the receive buffer
               goto riotuart_loop_store;
             }
             else

             // if we have received all data - the end of the message
             {
               // calculate the checksum (excluding CS itself)
               this->rx_cs = 0;
               for (size_t i=0; i<this->rx_len; i++)
                 this->rx_cs ^= this->rx_buf[i];

               // does the checksum match (ensure type == same)
               if (this->rx_cs == this->rx_buf[this->rx_len])
               {
#if defined(ENABLE_DEBUG)
                 // debugging purposes
                 dbgUART.println(":: recv");
                 dbgUART.print("length:     ");
                 dbgUART.println(this->rx_len);
                 dbgUART.print("checksum:   0x");
                 c = this->rx_cs;
                 if (c < 16) dbgUART.write('0');
                 dbgUART.println(c, HEX);
                 dbgUART.print("recv (HEX): ");
                 for (size_t i=0;i<this->rx_len; i++)
                 {
                   c = this->rx_buf[i];
                   if (c < 16) dbgUART.write('0');
                   dbgUART.print(c, HEX);
                   if (i != (this->rx_len-1)) dbgUART.write(' ');
                 }
                 dbgUART.println();
                 dbgUART.print("recv (ASC): ");
                 for (size_t i=0; i<this->rx_len; i++)
                 {
                   c  = this->rx_buf[i];
                   if ((c >= 0x20) && (c < 0x7f)) dbgUART.write(c);
                   else                           dbgUART.write('.');
                 }
                 dbgUART.println();
                 dbgUART.flush();
#endif

                 //
                 // MICROCONTROLLER CONTROL
                 //

                 // START
                 if (strncmp((char *)this->rx_buf, "START", 5) == 0)
                 {
                   g_application_status = APP_STATE_INIT;
                 }
                 else

                 // FINISH
                 if (strncmp((char *)this->rx_buf, "FINISH", 6) == 0)
                 {
                   g_application_status = APP_STATE_QUIT;
                 }
                 else

                 //
                 // OTHER MESSAGES - WHILE RUNNING
                 //

                 // we only process messages if the application is running
                 if (g_application_status == APP_STATE_LOOP)
                 {
                   this->callback(this->rx_buf, this->rx_len);
                 }
                 else

                 // not started and receiving messages already - initialize
                 {
                   g_application_status = APP_STATE_INIT;
                 }

                 // prepare for a new message to be received
                 this->rx_start   = false;
                 memset(this->rx_buf, 0, CORE_SER_RX_BUF_SIZE);
                 this->rx_buf_idx = 0;
                 this->rx_len     = 0x100; // impossible value
               }
               else
               {
#if defined(ENABLE_DEBUG)
                 dbgUART.println(":: RIoTUART.recv - message checksum mismatch");
#endif
               }
             }
           }

           // we are done; move along to next message
           goto riotuart_loop_recv_done;

      default:

riotuart_loop_store:;

           // start of packet? first byte is length
           if (this->rx_start)
           {
             this->rx_start = false;
             this->rx_len   = c;
           }
           else

           // packet hasn't started - ignore data
           if (this->rx_len != 0x100)
           {
             // store the value
             this->rx_buf[this->rx_buf_idx++] = c;

             // have we received too many bytes? malformed packet or bogus?
             if (this->rx_buf_idx > (this->rx_len+2))
             {
#if defined(ENABLE_DEBUG)
               // debugging purposes
               dbgUART.println(":: RIoTUART.recv - rx buffer overflow");
#endif

               // prepare for a new message to be received
               this->rx_start   = false;
               memset(this->rx_buf, 0, CORE_SER_RX_BUF_SIZE);
               this->rx_buf_idx = 0;
               this->rx_len     = 0x100; // impossible value

               // we are done; move along to next message
               goto riotuart_loop_recv_done;
             }
           }
           break;
    }
  }

riotuart_loop_recv_done:;

  //
  // SENDING - if the developer has queued up any messages, send them
  //

  // do we have anything to send?
  if ((this->tx_buf_idx > 2) && (this->tx_buf_idx < 257))
  {
    // we now know the length of our packet
    this->tx_len    = this->tx_buf_idx-2;
    this->tx_buf[1] = this->tx_len;

    // calculate the checksum of the entire message
    this->tx_cs = 0;
    for (size_t i=0; i<this->tx_len; i++)
      this->tx_cs ^= this->tx_buf[i+2];

    // and now we know the checksum
    this->tx_buf[this->tx_len+2] = this->tx_cs;
    this->tx_buf[this->tx_len+3] = 0x03; // ETX

#if defined(ENABLE_DEBUG)
    uint8_t c;

    dbgUART.println(F(":: send"));
    dbgUART.print(F("length:     "));
    dbgUART.println(this->tx_len);
    dbgUART.print(F("checksum:   0x"));
    c = this->tx_cs;
    if (c < 16) dbgUART.print(F("0"));
    dbgUART.println(c, HEX);
    dbgUART.print(F("send (HEX): "));
    for (size_t i=0;i<this->tx_len; i++)
    {
      c = this->tx_buf[i+2];
      if (c < 16) dbgUART.write('0');
      dbgUART.print(c, HEX);
      if (i != (this->tx_len-1)) dbgUART.write(' ');
    }
    dbgUART.println();
    dbgUART.print(F("send (ASC): "));
    for (size_t i=0; i<this->tx_len; i++)
    {
      c = this->tx_buf[i+2];
      if ((c >= 0x20) && (c < 0x7f)) dbgUART.write(c);
      else                           dbgUART.write('.');
    }
    dbgUART.println();
#endif

    // 0x02 LEN { DATA } CS 0x03
    SerialX.write(this->tx_buf, this->tx_len+4);
    SerialX.flush();

    // initialize buffers - for sending data
    memset(this->tx_buf, 0, CORE_SER_TX_BUF_SIZE);
    this->tx_buf_idx = 2;
    this->tx_buf[0]  = 0x02; // STX
    this->tx_buf[1]  = 0x00; // len (to be provided later)
  }
}

// void
// RIoTUART::queue(uint8_t *buf, size_t ofs, size_t len)
//
// queue a message into the RIoTUART that will be sent during the
// subequence maintenance handler of the RIoTUART connection.
//
// @param  buf - a pointer to the buffer to send
// @param  ofs - the offet within the buffer to retrieve bytes
// @param  len - the number of bytes to queue
// @return true on success, false if buffer is full
//
// EXAMPLE USAGE:
//
// {
//   if (riotUART.queue(rx, len)) // success
//   else { }                     // failure, buffer full
// }

bool
RIoTUART::queue(uint8_t *buf, size_t ofs, size_t len)
{
  bool success = false;

  // do we have room for the message in the tx buffer?
  if ((this->tx_buf_idx + len) < (CORE_SER_TX_BUF_SIZE-4))
  {
    // insert the message into the queue
    memcpy(&this->tx_buf[this->tx_buf_idx], &buf[ofs], len);
    this->tx_buf_idx += len;

    // inform the developer the message was queued successfully
    success = true;
  }

  return success;
}

// void
// RIoTUART::end()
//
// terminate the connection between the RIoTClient and the application.
//
// @param  none
// @return none

void
RIoTUART::end()
{
  // terminate the serial connection to RIoT Fusion
  SerialX.end();
#ifdef RIOT_UART_SOFTWARE
  pinMode(serialXRxPin, INPUT);
  pinMode(serialXTxPin, INPUT);
#endif
}

#endif

//--------------------------------------------------------------------------
4.9.3. How Packet Send Works
The following function creates a packet in binary format and sends it to the server:
void send_counter()
{
  uint16_t value = (uint16_t) g_counter;

  g_message[0] = '*'; // * = high priority,  # = normal priority
  g_message[1] = 'c'; // packet id
  g_message[2] = 2;   // data length in bytes
  g_message[3] = 0xFF & (value >> 8);
  g_message[4] = 0xFF & (value);

  riotUART.queue(g_message, 0, MESSAGE_PACKET_SIZE);
}
The counter value is an unsigned 16 bit integer.
The message consists of 5 bytes.
The first byte is a priority indicator. The character ‘*’ means “high priority” and ‘#’ means “normal priority”. For efficiency reasons, normal priority messages may be buffered and sent in a bigger batch. High priority messages are sent as soon as possible.
The second byte is a character with the packet id, as specified in the packet definition.
The third byte is the number of data bytes in the message. For the 16 bit counter value, 2 bytes are used.
The fourth and fifth byte contain the integer value. Bitwise operators are used to mask out and shift the byte values for the 16 bit integer.
The call to the queue function adds the message to the message queue maintained by the Core Firmware on the Core Microcontroller.
The IoT Server converts the message to JSON format and sends a PUT request with the data to the address of the Destination URL.
4.10. Deploy the Application Firmware to the Device
Here us a summary of how to deploy the Application Firmware:
-
Open the Arduino IDE.
-
Select the board in the Tools/Board menu.
-
Export the compiled sketch with menu command Sketch/Export compiled Binary.
-
Locate the exported file (which will be uploaded to the Management Console):
build/arduino.avr.uno/CounterUnoMega.ino.hex (Arduino Uno)
build/arduino.avr.mega/CounterUnoMega.ino.hex (Arduino Mega)
build/arduino.renesas_uno.unor4wifi/CounterUnoR4.ino.hex (Arduino Uno R4 WiFi) -
Log in to the Management Console.
-
Nagivate to the Firmwares Screen.
-
Create a new firmware entry (see the enrollment tutorial for settings). Select the exported file for upload.
-
Navigate to the Devices Screen.
-
Open the device.
-
Scroll to the Microcontrollers Section.
-
Edit the microcontroller and select the new firmware.
-
Update the microcontroller setting.
Next time the device connects, it will download and install the new application firmware.
5. Verify That It Works
5.1. Check the JSON Data File
Open a web browser and check the contents of the file data_counters.json:
https://mywebserver.com/data_counters.json
Allow a couple of minutes for the application firmware update to complete, and for data to be sent to the server.
5.2. Open the Web Application Dashboard
To view the device dashboard enter a URL on the following format:
https://mywebserver.com/dashboard-counter.html
To check for errors, open the debug console in the web browser and consult the log messages.
5.3. Debugging Application Firmware
If there is a need to debug the application firmware running on the device, the serial port can be used to send debug messages over USB to the computer. To learn more, read the Serial Debugging documentation.