REST API Data Model
This document describes the data model and the schema used by the REST API. The REST API is used to access data in the OASIS Cloud.
The React Management Console provides code examples for the concepts discussed in this document. Contact us to get access to the source code for the React Management Console.
1. REST API Basics
1.1. The OASIS Cloud
The purpose of the REST API is to access data in the OASIS Cloud.
The OASIS cloud contains information about IoT system deployments. OASIS can host multiple independent customers and customer installations. A customer deployment is represented by the “tenant” entity, which is used by the REST API to access data specific to and IoT installation.
The REST API facilitates life cycle management of an IoT deployment and allows full control of the IoT devices stored in a customer installation in the cloud.
1.2. REST API Calls
The REST API is invoked by sending requests via the HTTPS protocol. API calls can be made with any system or programming language that supports HTTPS requests, such as a web browser, or server-side code written in for example PHP, Python, or JavaScript.
1.3. Security
The REST API is secured by an authentication mechanism that involves multiple hashes based on the username, password, and a nonce consisting of a timestamp and a random string.
The request header for REST API calls must include an “Authorization” entry with authentication information.
Here is an example of an “Authorization” header entry:
Authorization: oasis
  username="user@host.com",
  nonce="5EE5E445KAHT2OSOVDA4CDU9JUBXO2VV",
  authority="02139D7FD9915D75A155111F84C3160B"
For description of how the authorization values are computed, see the REST API Overview and the REST API Developer Guide.
1.4. Routes
REST API calls are based on request routes that map to objects. To create, access, update, or delete an object, the appropriate route and request method must be used.
A route is made up of a URI (Uniform Resource Identifier), which is an access path that identifies an object or resource.
Basic URI structure:
/{object}/{object_id}
To access properties of an object, the “keys” keyword is used (“keyname” is the property name):
/{object}/{object_id}/keys/{keyname}
Objects can have subobjects, which are accessed like this:
/{object}/{object_id}/{subobject}/{subobject_id}
Access keys of a subobject:
/{object}/{object_id}/{subobject}/{subobject_id}/keys/{keyname}
For the full list of the available routes, see the REST API Routes documentation.
1.5. Request Methods
The action performed when sending a REST API request depends on the HTTP method used. When creating or updating an object, data is submitted in the request body. Requests that read or delete objects have an empty request body. To read the schema for an object, the OPTIONS method is used.
The following table provides a summary of available request methods:
| Action | Method | Request Body |
|---|---|---|
| Create | POST | JSON or binary data |
| Read | GET | empty |
| Update | PUT | JSON |
| Delete | DELETE | empty |
| Read schema | OPTIONS | empty |
1.6. Responses
The response of a REST API call varies depending on the request request made. Requests that read data return JSON or binary data in the response body. Create requests return the id of name of the created object as a plain (non-JSON) string. Other requests return an empty body. The HTTP response code depends of the action performed.
The following table provides a summary of responses:
| Action | Method | Response Code | Response Body |
|---|---|---|---|
| Create | POST | 201 | string (id or name) |
| Read | GET | 200 | JSON or binary data |
| Update | PUT | 202 | empty |
| Delete | DELETE | 204 | empty |
| Read schema | OPTIONS | 200 | JSON |
1.7. Errors
If a request error occures, an error code is returned with the response. In this case, the response body contains an error message.
See the REST API Response Codes documentation for a complete list of response codes.
1.8. The expand Query Parameter
The “expand” query parameter is used with GET requests to specify that full object data should be returned in the JSON response body.
The expand parameter is specified by appending “?expand” to the URI:
/{uri}?expand
1.9. Examples
The following examples illustrate how to make various REST API calls.
1.9.1. Read
Request a list of the devices that belong to an IoT deployment (identified by a tenant object). The request returns a JSON array that includes the numerical ids of the devices for the tenant with id 2.
GET /tenant/2/device
Request a list that includes the full data objects for the devices of a given tenant. The request includes the “expand” parameter, and returns a JSON array that includes the devices as JSON objects.
GET /tenant/2/device?expand
Request data for a single device of a tenant. The request returns a JSON object with the data for device with id 3.
GET /tenant/2/device/3?expand
Request the name of an IoT device with id 3. The request returns a string with the name of the device.
GET /tenant/2/device/3/keys/name
Note that reading full objects by specifying the expand parameter is in general more convenient than reading individual keys, since all keys for a object are returned in a single response.
1.9.2. Create
Request a new device object to be created for a given tenant. The request body should include JSON data for the device to be created.
POST /tenant/2/device
1.9.3. Update
Request a device object to updated. The request body should include JSON data for the keys to be updated. Multiple keys can be updated in a single request.
PUT /tenant/2/device/3
Request a single key of a device object to updated. The request body should include JSON data for the key, in this case a string with the new device name.
PUT /tenant/2/device/3/keys/name
Note that the first form (updating multiple keys at once) is in general more flexible to use, as it can also handle the case of updating a single key.
1.9.4. Delete
Request a device to be deleted.
DELETE /tenant/2/device/3
1.9.5. Read schema
Request the schema for the device object. The following two requests will return the same schema.
OPTIONS /tenant/2/device
OPTIONS /tenant/2/device/3
1.9.6. URLs
The full URL for a request includes the protocol, domain, and port, followed by the URI.
Here is an example:
GET https://host.com:6443/tenant/2/device
With the expand parameter:
GET https://host.com:6443/tenant/2/device?expand
Note that the header of the request must include the “Authorization” entry, or the request will be rejected with an error message.
2. Data Model
2.1. Object Types
The OASIS data model is the basis for the REST API. There are two types of objects: entities and assets.
2.1.1. Entities
Entities represent objects that can have a nested structure. An example is the “device” entity, which represents an IoT device. Entities can be created, updated, and deleted.
2.1.2. Assets
Assets represent file objects, such as images and firmware files. Assets can be created and deleted, but cannot be modified once created.
2.2. Tenants and Objects
2.2.1. Tenants
A central entity is the “tenant” object, which represents a customer deployment of an IoT system.
An OASIS server can host multiple independent tenants.
A tenant owns the entities and assets that are part of the IoT system deployment.
The following are the objects that belong to a tenant:
| Name | Type |
|---|---|
| user | entity |
| device | entity |
| packet | entity |
| hardware interface | entity |
| application firmware | asset |
Tenant objects are accessible by logged in tenant users. User permissions control which information is available and which actions are allowed.
2.2.2. Global objects
The following global data objects are shared by tenants:
| Name | Type |
|---|---|
| modem | entity |
| microcontroller | entity |
| image | asset |
| code firmware | asset |
Tenant users may view the above entities and assets, but only the admin user may create and update global objects and create tenants.
2.2.3. Summary of object types
Summary of the object types in the REST API:
| Name | Type | Description |
|---|---|---|
| tenant | entity | system deployment owner |
| tenant.user | entity | tenant user |
| tenant.device | entity | IoT device object |
| tenant.packet | entity | IoT device data packet |
| tenant.interface | entity | IoT device hardware interface configuration |
| tenant.firmware_appl | asset | application firmware file |
| modem | entity | microcontroller running the FUSION client |
| microcontroller | entity | microcontroller running application firmware |
| firmware_core | asset | FUSION Core Firmware file running on the modem |
| image | asset | image file |
User types:
| Name | Description |
|---|---|
| admin user | system administrator |
| tenant user | tenant administrator or tenant viewer user |
Tenant users can be given custom permissions to extend or restrict the operations allowed for a specific user.
2.3. Object Fields
At the topmost object level, there are the following standardized fields for entities and assets.
2.3.1. Entity fields
Entity fields:
id (system-generated numeric id)
keys
  ... (properties of the entity)
meta
  created (timestamp)
  modified (timestamp)
Entities may also have top-level fields the contain the ids of related objects. An example is the “id_tenant” field, which contains the id of the tenant which an entity belongs to.
The “keys” field contains the properties of an entity. Properties can contain child objects and arrays of objects. Properties can be read-only, which means they cannot be updated.
2.3.2. Asset fields
Asset fields:
name (user-specified string id)
info
  ... (properties of the asset)
The “info” properties contain data about the asset. These properties are read-only.
2.3.3. Keys and info properties
Info properties are always read-only, while keys are writeable or read-only depending on the settings defined in the schema.
Entities may contain both “keys” and “info”. An example of this is the device entity.
In the case of the device entity, keys contain data based on user settings, while info contains data generated by the system.
Assets never contain “keys”, but there is an implementation technique that will be discussed later on, that merges keys and info properties for uniform access.
2.4. Data Format
The data format used by the REST API is JSON.
JSON is used when creating and updating entities, and when requesting object data. The exception to this is when creating an asset, in which case multipart data is used instead of JSON.
The mime-types used for object creation are as follows:
- entity creation uses “application/json”
- asset creation uses “multipart/form-data”
The following is a summary of request/response formats:
| Action | Method | Request Body | Response Body |
|---|---|---|---|
| Create | POST | application/json or multipart/form-data | empty |
| Read | GET | empty | application/json or binary data |
| Update | PUT | application/json | empty |
| Delete | DELETE | empty | empty |
| Read schema | OPTIONS | empty | application/json |
2.5 Example Object (device)
This is the JSON data for a sample device object, obtained using a GET request:
Click to view JSON object
{
  "keys": {
    "firmware_core": "1_0_0_7-riot-MKRWIFI1010",
    "gps": {
      "latitude": "",
      "longitude": ""
    },
    "identifier": "MKRw",
    "integration": false,
    "maintenance": false,
    "microcontroller": [
      {
        "name": "ATmega328P",
        "identifier": "A421",
        "firmware_appl": "Blinky-1"
      }
    ],
    "name": "Arduino Uno",
    "settings": {
      "SSID": "Moto G42",
      "username": "",
      "password": "xxxxxxxx"
    },
    "modem": "MKR WiFi 1010",
    "network": "WiFi",
    "interface": "RIoT Fusion Shield - Arduino UNO"
  },
  "info": {
    "current_firmware_core": "1_0_0_7-riot-MKRWIFI1010",
    "enrolled": true,
    "gps": {},
    "guid": "524D6F554D4B527701237C774708FFDF",
    "memory": [
      {
        "zone": "normal",
        "cycles": 0,
        "health": 100,
        "inuse": 0
      },
      {
        "zone": "urgent",
        "cycles": 0,
        "health": 100,
        "inuse": 0
      }
    ],
    "microcontroller": [
      {
        "current_firmware_appl": "Blinky-1"
      }
    ],
    "modem_info": {
      "MAC": "F0:08:D1:CE:D8:04",
      "BSSID": "12:85:F1:AA:FE:5A"
    },
    "power": {
      "ignition": false
    },
    "server": { ... },
    "ts_comms": 1677417643
  },
  "id_tenant": 4,
  "id_modem": 3,
  "id_interface": 2,
  "meta": {
    "created": 1677416583,
    "modified": 1683634839
  },
  "id": 1
}
The “id” of the device is 1, and there are properties under both “keys” and “info”.
For example, the keys.microcontroller array contains one element, an object that represents the application microcontroller settings of the device. This object contains the “firmware_appl” field that has the name of the user selected application firmware.
The info.microcontroller array contains a corresponding object with system generated data about the currently running application firmware in the field “current_firmware_appl” (if the application firmware has not yet been updated on the device, this value may differ from the user selected value).
3. Schema
The structure of the data in the OASIS Cloud is defined by a schema. The schema contains structural information, and information about data types and allowed values. The OPTIONS request is used to obtain a schema via the REST API.
3.1. Background
The schema used by the OASIS data model is based on the JSON Schema specification published by the OpenJS Foundation.
The OASIS schema provides several extensions to the JSON Schema standard that are designed to address the specific needs of an IoT system.
The data format for the schema is JSON.
3.2. Schema Use Cases
The schema is used by several system components:
- REST API server - validate requests and to generate the schemas that are returned in response to OPTIONS requests
- OASIS Management Console - programatically generate the user interface and to validate user input
- REST API Test Suite - perform automated tests
Third party applications can use the schema to validate input and to generate user interface objects.
It should be clarified that the REST API can be used without the schema. However, the schema should be used to properly validate user input. Furthermore, the schema can be used to programmatically generate user interface components, and it is also useful for programmatic generation of test cases.
3.3. How to Obtain the Schema
The OPTIONS request is used to access the schema via the REST API. The schema is returned in the response as JSON data.
When learning the REST API, it is recommended to begin by doing basic GET requests using PHP (see the REST API Developer Guide) and inspect the JSON objects returned in the response. As the next step, make OPTIONS requests and inspect the corresponding schemas.
3.4. Schema Structure
The schema specifies the data structure for entities and assets. There is a schema for each object type and for each object property.
For example, the schema for the device entity specifies the properties of all fields of the device entity and its subobjects. The schema can be compared to a class definition that may contain child classes and has additional type annotations for each property.
In essence, the schema lists the properties of the object, along with type annotations.
3.4.1. Example schema (device)
Here is an example of the JSON data for the schema for the device entity (parts of the schema have been edited out for readability, since it is too extensive to be reproduced in full):
Click to view JSON schema
    {
      "$comment": "oasis-entity",
      "$schema": "tenant.device",
      "type": "object",
      "properties": {
        "id": {
          "type": "integer",
          "readOnly": true
        },
        "id_tenant": {
          "type": "integer",
          "readOnly": true
        },
        "id_modem": {
          "type": "integer",
          "readOnly": true
        },
        "keys": {
          "$schema": "tenant.device.keys",
          "type": "object",
          "properties": {
            "firmware_core": ...,
            "gps": ...,
            "identifier": ...,
            "integration": ...,
            "interface": ...,
            "maintenance": ...,
            "microcontroller": ...,
            "modem": ...,
            "name": ...,
            "network": ...,
            "settings": ...
          }
          "propertiesOrder": [
            "name",
            "maintenance",
            "modem",
            "identifier",
            "network",
            "enrolled",
            "guid",
            "ts_comms",
            "firmware_core",
            "current_firmware_core",
            "interface",
            "integration",
            "power",
            "modem_info",
            "settings",
            "gps",
            "microcontroller"
          ],
          "propertiesCollectiveHide": [
            "maintenance",
            "identifier",
            "firmware_core",
            "interface",
            "settings",
            "gps",
            "microcontroller"
          ]
        },
        "info": {
          "$schema": "tenant.device.info",
          "type": "object",
          "properties": {
            "current_firmware_core": ...,
            "enrolled": ...,
            "gps": ...,
            "guid": ...,
            "memory": ...,
            "microcontroller": ...,
            "modem_info": ...,
            "power": ...,
            "server": ...,
            "ts_comms": ...
          },
          "propertiesOrder": [
            "enrolled",
            "guid",
            "ts_comms",
            "current_firmware_core",
            "power",
            "modem_info",
            "gps",
            "memory",
            "microcontroller",
            "server"
          ],
          "propertiesCollectiveHide": [
            "guid",
            "integration",
            "power",
            "modem_info",
            "gps",
            "memory",
            "microcontroller",
            "server"
          ]
        },
        "meta": ...
      },
      "propertiesOrder": [
        "id",
        "id_tenant",
        "id_modem",
        "keys",
        "info",
        "meta"
      ]
    }
3.4.2. Schema fields
The fields listed below can occur on entities and assets, and on child objects.
Entities may have a nested structure, where properties (keys) contain objects.
Object properties may in turn have properties that are child objects.
Basic schema fields:
| Name | Description |
|---|---|
| $comment | the comment field contains meta-data for object types (see description below); for entities and assets this field specifies type (entity" or "asset"); for object and child object properties, this field is an OASIS type (also called "UX Hint"); this is different from the "type" field, which contains the data type) |
| $schema | the name/identifier of the schema |
| $type | the data type of the property, for example: "object", "string", or "integer" (this can also be an array of data types or schemas) |
| properties | the properties field contains the schemas for all properties at the current level of the schema |
| propertiesOrder | an array with property names in the order in which they should be shown when an object is displayed in the UI |
| propertiesCollectiveHide | an array with properties that should be hidden (not displayed) when objects are shown in a table view |
The $comment field is used to provide additional type information to that given in the $type field.
For entities and assets (top-level objects), the $comment field specifies the object type (“oasis-entity” or “oasis-asset”).
For object and child object properties, the $comment field specifies an OASIS type (also called “UX Hint”). These types are described below in section 4.3.
3.4.3 Accessing schema entries
The schema describes the object data structure. This is similar to the class/instance relation in object-oriented programming.
When programming applications that use the schema, a frequent operation is to find the schema entry for a certain property, to validate the property or determine how to display the property.
Here follows a comparison between the object representation in the schema and the object data.
For example, the “name” property value of a device is available in the “keys.name” field of the object:
{
  "keys": {
    "name": "Arduino Uno",
    ...
  }
}
The corresponding schema for the “name” property is in “properties.keys.properties.name”:
{
  "properties": {
    "keys": {
      "properties": {
        "name": {
          "type": "string",
          "pattern": "^[\\S\\. ]+$",
          "minLength": 1,
          "maxLength": 255,
          "unique": true,
          "required": true,
          "$schema": "tenant.device.keys.name"
        },
        ...
      },
      ...
    },
    ...
  },
  ...
}
In Javascript, the data in the “name” field can be accessed this:
const json = (get the device JSON data using the REST API);
const device = JSON.parse(json);
const name = device.keys.name;
console.log('Device name is: ' + name);
The corresponding schema for the “name” field can be accessed like this:
const json = (get the schema for the device entity using an OPTIONS request);
const schema = JSON.parse(json);
const propSchema = schema.properties.keys.properties.name;
console.log('Data type for keys.name is: ' + propSchema.type);
3.4.4 More about schema access and object properties
Accessing properties in the schema uses the “properties” field (which is not present in the object data). The reason for having the “properties” field in the schema, is that the schema contains meta-data that needs to be available, alongside the schema entries for the properties.
Access top-level schema properties like this:
schema.properties.propertyName
For example:
schema.properties.id
Access properties under keys like this:
schema.properties.keys.properties.propertyName
For example:
schema.properties.keys.properties.settings
For subobjects use:
propSchema.properties
For example:
schema.properties.keys.properties.settings.properties.SSID
Typically one would first find the object schema, then access the schemas for the object properties:
const keysSchema = schema.properties.keys;
const objSchema = keysSchema.properties.settings;
const propSchema = objSchema.properties.SSID;
console.log('settings.SSID has type: ' + propSchema.type);
Note that the above example is simplified. The “settings” object has the OASIS type “oasis-multiobject”, which means that the schema for the settings property can vary. The above code assumes it is of type “#settings-WiFi”.
This is what the (partial) schema for “settings” looks like:
"settings": {
  "$comment": "oasis-multiobject",
  "$id": "#settings-@network",
  "type": [ (array with schemas for each allowed type) ],
  ...
}
Here “type” field is an array that contains the schemas for each possible type. The property schema is determined by the current value of the “network” property, which is specified in the “$id” field.
Multiobjects are an advanced schema concept, which will be covered in detail later.
3.4.5 Schema array item access
When an object is an array, the schema uses the “items” entry to specify the schema for the array elements.
As an example, the device object contains an array with the microcontroller(s) of the device.
To begin with, here is the sample object data, and array with one object:
{
  "keys": {
    "microcontroller": [
      {
        "name": "ATmega2560",
        "identifier": "A900",
        "firmware_appl": "Serial-1"
      }
    ],
    ...
  },
  ...
}
To access the value of the name of the first microcontroller, this code can be used:
const json = (get the device JSON data using the REST API);
const device = JSON.parse(json);
const microcontroller = device.keys.microcontrollers[0]
const name = microcontroller.name;
console.log('Microcontroller name is: ' + name);
Here is the (partial) schema for the “microcontroller” property:
"microcontroller": {
  "$comment": "oasis-array",
  "type": "array",
  "minItems": 0,
  "maxItems": 4,
  "derivative": true,
  "items": {
    "type": "object",
    "properties": {
      "name": {
        "type": "string",
        "pattern": "^[\\S\\. ]+$",
        "minLength": 1,
        "maxLength": 255,
        "readOnly": true,
        "required": true
      },
      ...
    },
    ...
  },
  ...
}
The schema for array items is under the “items” property:
schema.properties.arraySchema.items
For the microcontroller property, the item schema is referenced by:
schema.properties.microcontroller.items
Here is how to get the schema for the name property of a microcontroller array element:
schema.properties.keys.properties.microcontroller.items.properties.name
Sample code:
const keysSchema = schema.properties.keys;
const arraySchema = keysSchema.properties.microcontroller.items;
const propSchema = arraySchema.properties.name;
console.log('microcontroller.name has type: ' + propSchema.type);
4. Type Specifiers
Each type (node) in the schema tree has specifiers that declare the value type and any constraints for the value.
4.1. Data Types
The “type” field in the schema contains the data type of the property.
The following types are allowed:
| Type | Description |
|---|---|
| integer | the value is an integer |
| number | the value is an integer or a decimal number |
| string | the value is a string |
| boolean | the value is true or false |
| object | the value is an object (represented as a JSON object) |
| array | the value is an array (represented as a JSON array) |
| null | the property is not set |
In addition, the “type” field may contain an array. This may be an array of the above types, or an array of schema entries.
Here is an example of a type array that specifies that the value can be an integer or null:
[ "integer", null ]
Multiobject types have a “type” field that contains an array of schema entries (see the description of multiobjects).
4.2. Value Constraints
Constraints on values are declared using the following schema specifiers.
| Constraint | Affected Type | Description |
|---|---|---|
| required | all | the property must be set |
| maximum | number | max value allowed |
| minimum | number | min value allowed |
| divisibleBy | integer | value must be divisible by |
| pattern | string | regular expression that must match the string value |
| maxLength | string | max string length allowed |
| minLength | string | min string length allowed |
| maxItems | array | max number of array items allowed |
| minItems | array | min number of array items allowed |
| unique | integer or string | object property value must be unique among objects in the same array |
| unique_together | integer or string | combination of object property values must be unique among objects in the same array (siblings) |
| distinct | integer or string | property values must be unique among distinct properties within the object, and among distinct object properties of objects in the same array (siblings) |
| derivative | object/array | property value is derived from a related object or array; this is done on object creation - derivative values may not be updated, and when an array is a derivative, the array may not be altered (it is fixed) |
The above constraints can be used by an application to validate user input. The data type information (in the “type” field) is also useful for input validation.
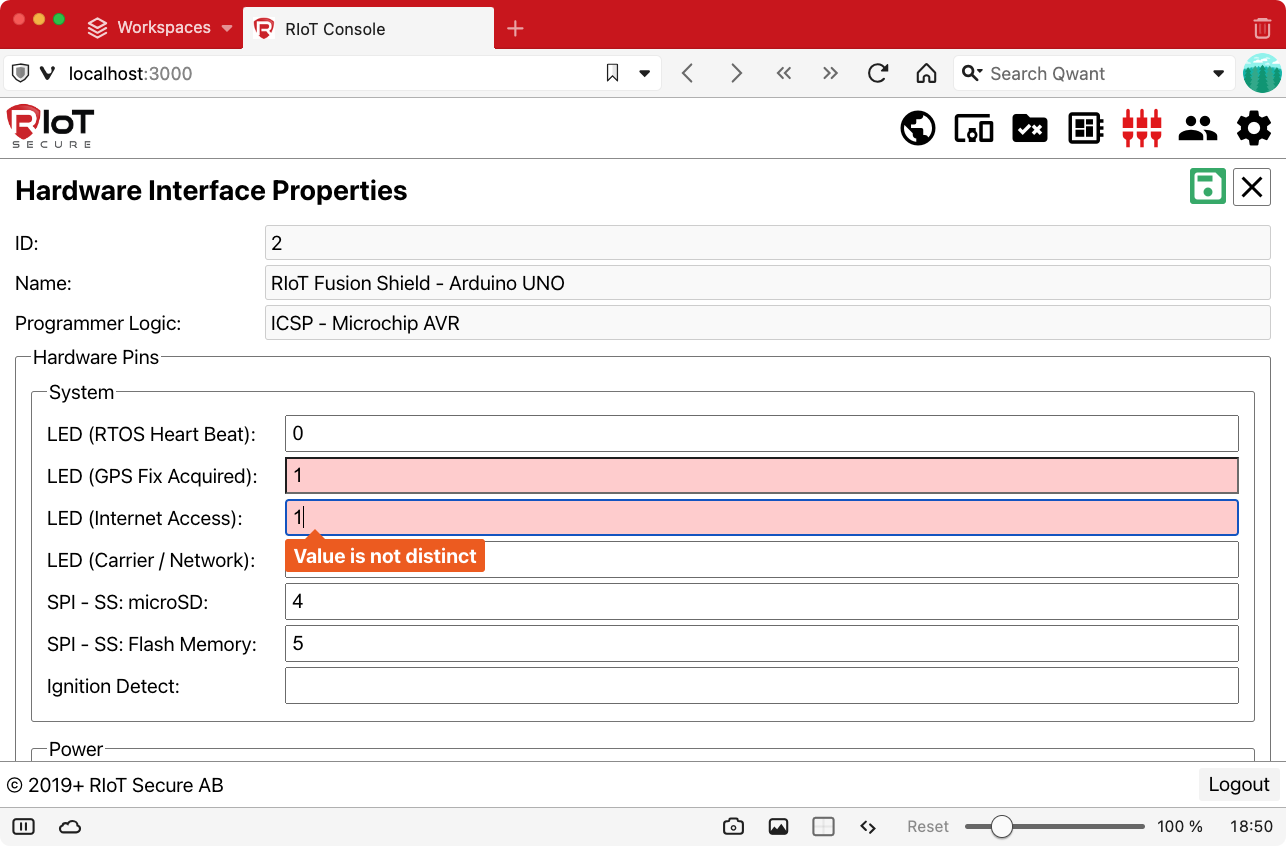
The following screenshot from the Hardware Interface screen of React Management Console shows the user interface feedback for the validation of the “distinct” constraint.
4.3. OASIS Types (UX Hints)
The OASIS types are specified in the $comment field of the schema. The names of these types are prefixed with “oasis-”. The OASIS type provides additional information to that given in the “type” field.
Commonly, these type are used to provide “User Experience Hints” (UX Hints), which an application can use to generate the user interface components.
The following OASIS types are available:
| Type | Description | UX Hint |
|---|---|---|
| oasis-entity | the object is an entity | display form fields for the object in the UI |
| oasis-asset | the object is an asset | display form fields for the object in the UI |
| oasis-image | the property is an image | display the image in the UI |
| oasis-array | the property is an array of objects | display a list of objects in the UI |
| oasis-index | the property is a sequential sort index of an item in an array of objects | display UI elements to move/position array items |
| oasis-select | the allowed property values are specified in an enum in the schema | display a select menu in the UI |
| oasis-checkbox | the property value can true or false | display a checkbox or switch the UI |
| oasis-textarea | the property value is a multi-line string | display a text area input element in the UI |
| oasis-password | the property value is a password | display a masked input element in the UI, and provide a password validation input field |
| oasis-timestamp | the property value is a an EPOCH timestamp | display a formatted DateTime value for the timestamp in the UI |
| oasis-permission | the property value is an array of user permissions that define CRUDO operations | display a list of permission entries in the UI with checkbox or switch input elements |
| oasis-crossreference | the value of the property depends on an other value | dynamically compute the value |
| oasis-multiobject | the type of the property depends on an other value | dynamically compute the schema for the object and display the corresponding form fields |
| oasis-contextual | the property requires a specific context to be used | (is this used? occurs in packet component-string) |
For properties that do not specify a UX Hint in the $comment field, a single line input field can be used.
In addition to the above UX Hints, the “type” field in the schema provides useful information with respect to the user interface.
Also see the REST API Overview.
4.4. Crossreferences and Multiobjects
Sometimes a property value or an object type can depend on some other value.
Crossreferences and multiobjects are types in the schema that depends on the value of a controlling property.
The difference is that a crossreference is related to the property value, but a multiobject is related to the schema type of the property. The controlling property is always a value on the data object.
Crossreferences:
- The value of a crossreference type depends on the value of a controlling property.
- When the controlling property changes, the value of the dependent crossreference changes.
Multiobjects:
- The type of a multiobject is a type depends on the value of a controlling property.
- When the controlling property changes, the type of the dependent multiobject changes.
4.4.1. Crossreferences
A crossreference is a type whose value depends on the value of a controlling property. The controlling type is an enum, which maps to the enum of the crossreference type.
The “network” property of a device is an example of a crossreference - the value of the “network” property will vary, depending on the value of the “modem” property.
For example, if the value of “modem” is “MKR WiFi 1010”, the schema for the “network” property specifies that the derived value should be “WiFi”, as is shown in this example of a device object:
{
  "keys": {
    "modem": "MKR WiFi 1010",
    "network": "WiFi",
    ...
  },
  ...
}
Here is the corresponding schema for the “modem” and “network” properties:
{
  "$comment": "oasis-entity",
  "$schema": "tenant.device",
  "type": "object",
  "properties" {:
    ...,
    "keys": {
      "$schema": "tenant.device.keys",
      "type": "object",
      "properties": {
        "modem": {
          "$comment": "oasis-select",
          "type": "string",
          "enum-ref": {
            "$ref": "schema.modem#keys/name"
          },
          "readOnly": true,
          "required": true,
          "$schema": "tenant.device.keys.modem",
          "enum": [
            "Java Simulator",
            "MKR 1000",
            "MKR WiFi 1010",
            "MKR GSM 1400",
            "MKR NB 1500"
          ]
        },
        "network": {
          "$comment": "oasis-crossreference",
          "$id": "@modem",
          "type": "string",
          "enum-ref": {
            "$ref": "schema.modem#keys/network"
          },
          "readOnly": true,
          "required": true,
          "$schema": "tenant.device.keys.network",
          "enum": [
            "Ethernet",
            "WiFi",
            "WiFi",
            "3G",
            "NB-IoT"
          ]
        },
        ...
      },
      ...
    },
    ...
  },
  ...
}
The value of the crossreference is computed using the following fields in the schema:
| Field | Description |
|---|---|
| $comment | specifies the OASIS type "oasis-crossreference" |
| $id | contains the name of the controlling property |
| enum | an array with the values that depend on the enum values of the controlling property |
The values in the “enum” arrays determine the crossreference value.
The controlling property is by convention always present at the same level as the crossreference property (it is a sibling property).
Here is a Javascript function that finds the crossreference value:
// Find crossreference value
// crossRefName - the name of the crossreference property
// parentObj - the parent data object
// parentSchema - the parent schema
function crossRefGetSelectedValue(crossRefName, parentObj, parentSchema)
{
  // Get crossreference schema
  const crossRefSchema = parentSchema.properties[crossRefName];

  // Get the name of the selector property (the controlling property)
  const id = propSchema['$id'];
  const parts = id.split('@');
  const selectorName = parts[1];

  // Get selector value
  const selectorValue = parentObj[selectorName];

  // Get selector schema
  const selectorSchema = parentSchema.properties[selectorName];

  // Get position of selector value in selector enum
  const selectorEnum = selectorSchema.enum;
  const selectorIndex = selectorEnum.indexOf(selectorValue)

  // Get corresponding value of the crossreference enum
  const crossRefValue = crossRefSchema.enum[refIndex];

  // Return the cross reference value
  return crossRefValue;
}
Here is an example of how to set the value of the crossreference property using the above function:
const crossRefValue = crossRefGetSelectedValue(crossRefName, parentObj, parentSchema);
parentObj[crossRefName] = crossRefValue;
Crossreferences can be used for creating dynamic user interfaces.
For example, when the user interacts with the web form for creating a device, the form fields for “network” will be empty initially.
Once the value of the “modem” field is selected by the user, the value for “network” is computed using the crossreference schema, and the field value is updated.
Should the user select another modem, the network property value is recomputed, and the form field is updated.
4.4.2. Multiobjects
A multiobject is a type that can vary. The type of a multiobject depends on the value of a controlling property.
The “settings” property of a device is an example of a multiobject type. The fields for the settings object will vary depending on the network type (which is turn is a crossreference).
For example, if the network type is “WiFi”, the settings object should have the properties “SSID”, “username”, and “password”, as is shown in this example of a device object:
{
  "keys": {
    "modem": "MKR WiFi 1010",
    "network": "WiFi",
    "settings": {
      "SSID": "YOUR WIFI NAME",
      "username": "",
      "password": "PASSWORD"
    },
    ...
  },
  ...
}
Here is the corresponding schema for the “settings” property:
{
  "$comment": "oasis-entity",
  "$schema": "tenant.device",
  "type": "object",
  "properties" {:
    ...,
    "keys": {
      "$schema": "tenant.device.keys",
      "type": "object",
      "properties": {
        "settings": {
          "$comment": "oasis-multiobject",
          "$id": "#settings-@network",
          "type": [
            {
              "id-ref": "#settings-",
              "$id": "#settings-Ethernet",
              "type": null
            },
            {
              "id-ref": "#settings-",
              "$id": "#settings-WiFi",
              "type": "object",
              "properties": {
                  "SSID": ...,
                  "username": ...,
                  "password": ...
              },
              "propertiesOrder": [
                  "SSID",
                  "username",
                  "password"
              ]
            },
            {
              "id-ref": "#settings-",
              "$id": "#settings-3G",
              "type": "object",
              "properties": {
                  "APN": ...,
                  "username": ...,
                  "password": ...
              },
              "propertiesOrder": [
                  "APN",
                  "username",
                  "password"
              ]
            },
            {
              "id-ref": "#settings-",
              "$id": "#settings-NB-IoT",
              "type": "object",
              "properties": {
                  "APN": ...,
                  "username": ...,
                  "password": ...
              },
              "propertiesOrder": [
                  "APN",
                  "username",
                  "password"
              ]
            }
          ],
          "$schema": "tenant.device.keys.settings"
        },
        ...
      },
      ...
    },
    ...
  },
  ...
}
The type of the multiobject is computed using the following fields in the schema:
| Field | Description |
|---|---|
| $comment | specifies the OASIS type "oasis-multiobject" |
| $id | contains the name of the controlling property |
| type | an array with the types that depend on the controlling property |
To compute the schema of the multiobject, the value of the controlling property is used. Thus, the instance data (the device object) is needed, in addition to the schema, to compute the schema to be used with a multiobject property such as “settings”.
The controlling property is by convention always present at the same level as the multiobject property (it is a sibling property).
The multiobject schema is found as follows:
- check if the value of $comment is “oasis-multiobject”
- take the “$id” property and extract the value after “@” - this is the name of the controlling property
- take the “$id” property and extract the value before “@” - this is the schema prefix of the dependent schema type
- obtain the value of the controlling property in the data object
- compute the multiobject schema selector by concatenating the schema prefix with the controlling property value
- search the “type” array using the schema selector by matching it with the “$id” property of the schemas on the array - the first match found is the schema to use with as the type for the multiobject
Here is a Javascript function that finds the multiobject schema using the above method:
// Find multiobject schema
// parentObj - the parent data object
// propSchema - the schema for the multiobject property
function multiObjectGetSelectedSchema(parentObj, propSchema)
{
  // Get multiobject schema selector
  const id = propSchema['$id'];
  const parts = id.split('@');
  const selectorBase = parts[0];
  const selectorProp = parts[1];

  // Selector property is on parent object (value might be undefined)
  const selectorValue = parentObj[selectorProp];

  // Set selector
  const selector = selectorBase + selectorValue;

  // Find schema for multiobject (might return undefined)
  const selectedSchema = propSchema.type.find((schema) => schema['$id'] === selector);

  // Return the schema
  return selectedSchema;
}
Multiobjects can be used for creating dynamic user interfaces.
For example, when the user interacts with the web form for creating a device, the form fields for “settings” will be empty initially.
Once the user selects a value for the “modem” property, the “network” field will be computed using the crossreference schema, and then the multiobject schema for “settings” is computed and used to display and validate the input fields for the settings object.
Note that multiobjects can depend on any property type, not only crossreferences as in the above example.
4.4.3. Examples
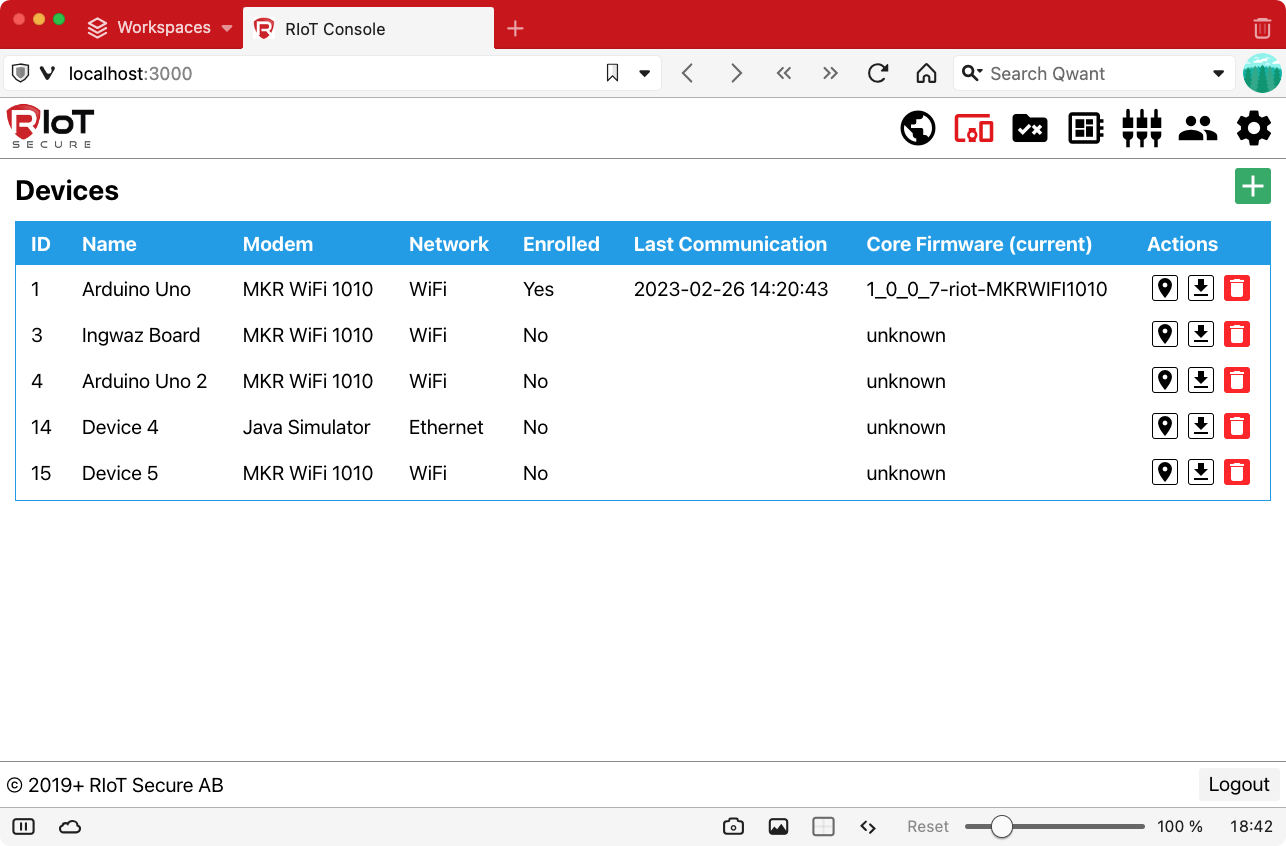
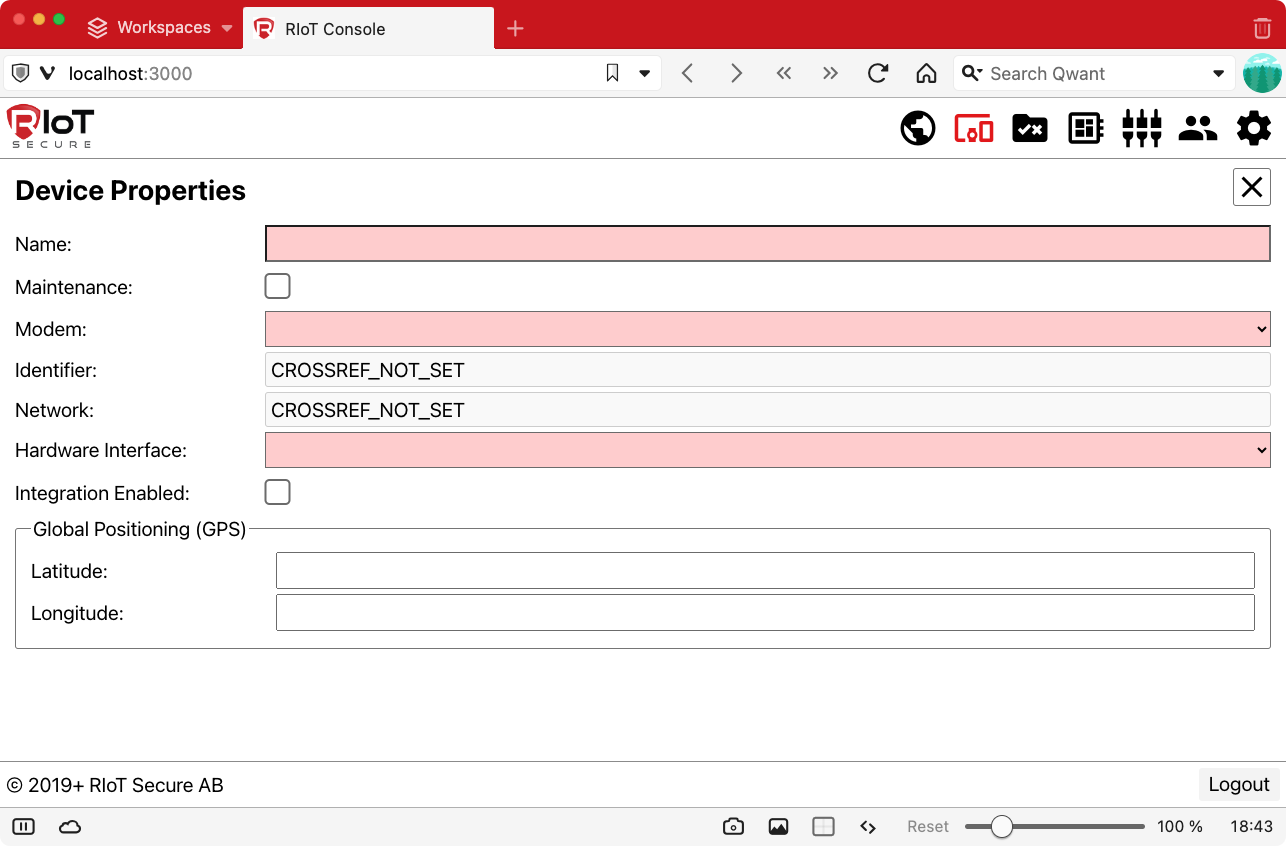
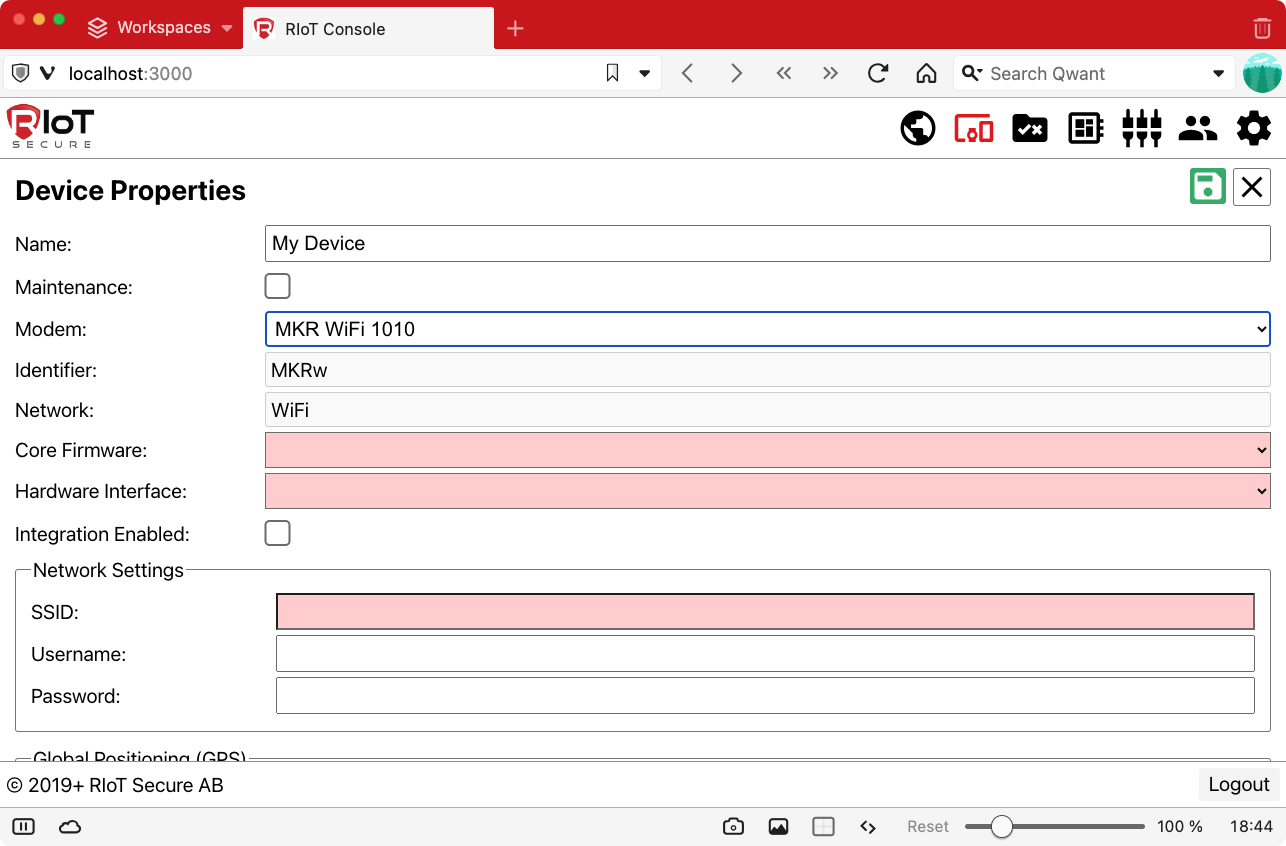
The following screenshots from the React Management Console show examples of how crossreferences and multiobjects are presented in the user interface.
- The first screen shows the list of IoT devices that are managed by the currently logged in tenant.
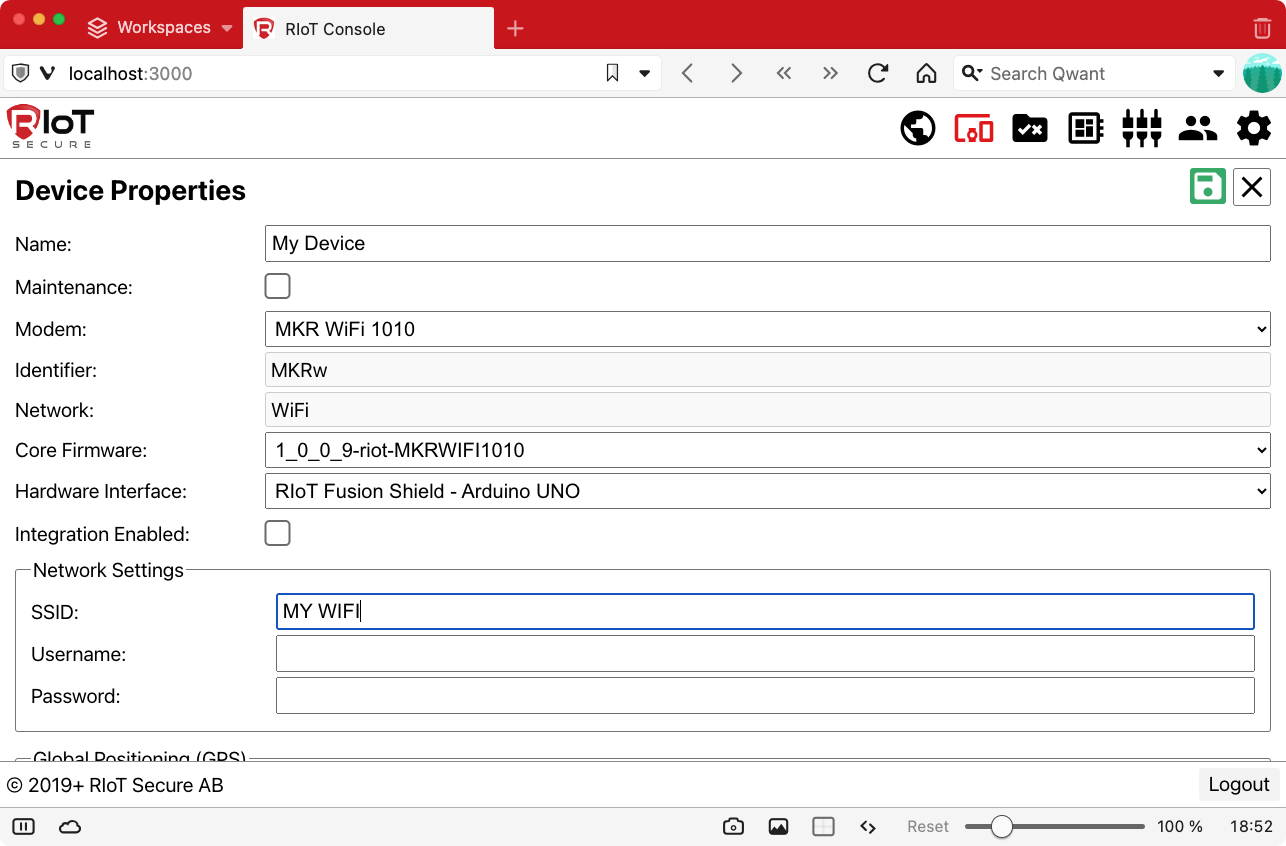
- When clicking the green “+” icon in the above screen, a form for creating a new device is presented. This form uses both crossreferences and multiobjects. The entries colored in light red are mandatory fields. The entries that are crossreferences are labeled with “CROSSREF_NOT_SET” for illustrative purposes (these values are not yet computed since the controlling value is undefined initially).
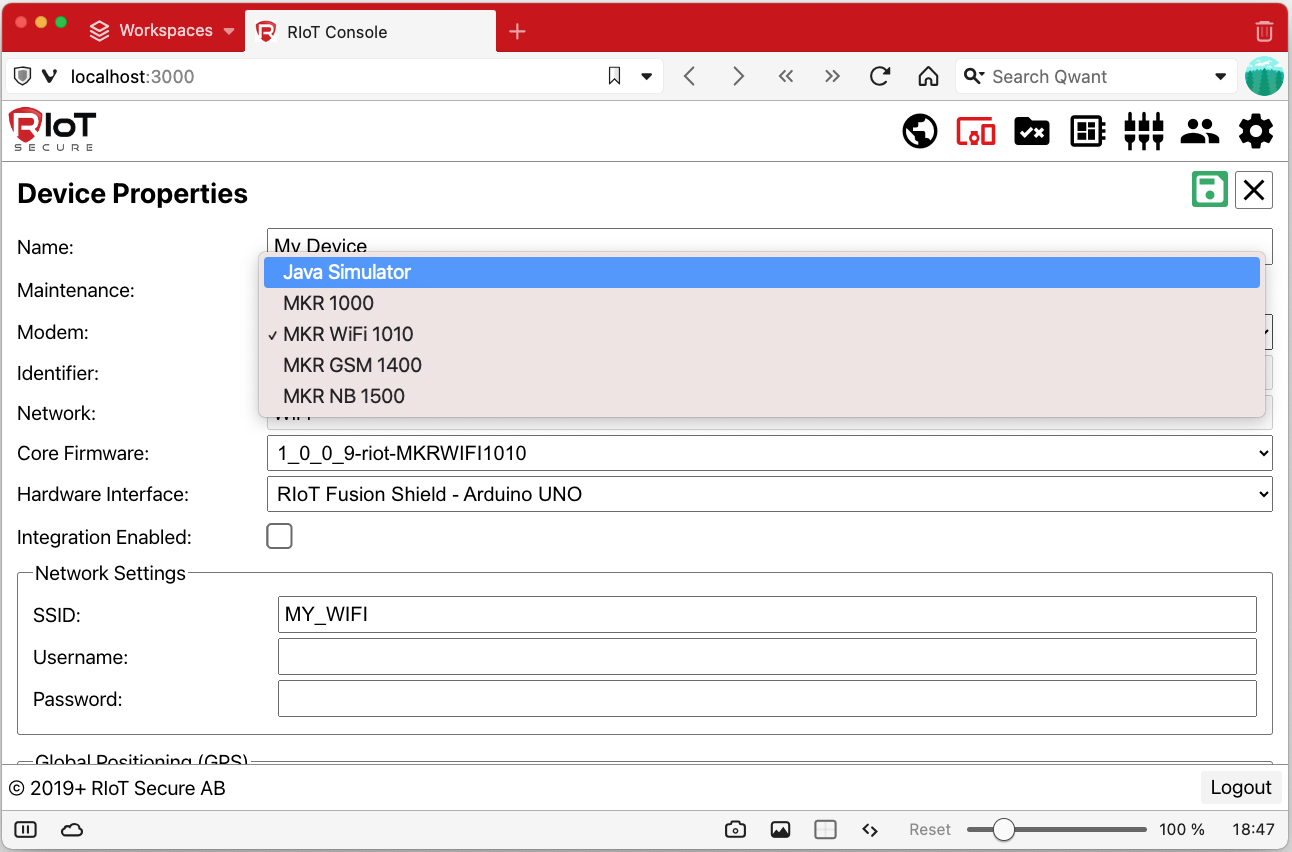
- This screenshot shows the “Modem” menu, where the modem microcontroller is selected. The value of this entry controls the content of the crossreference fields.

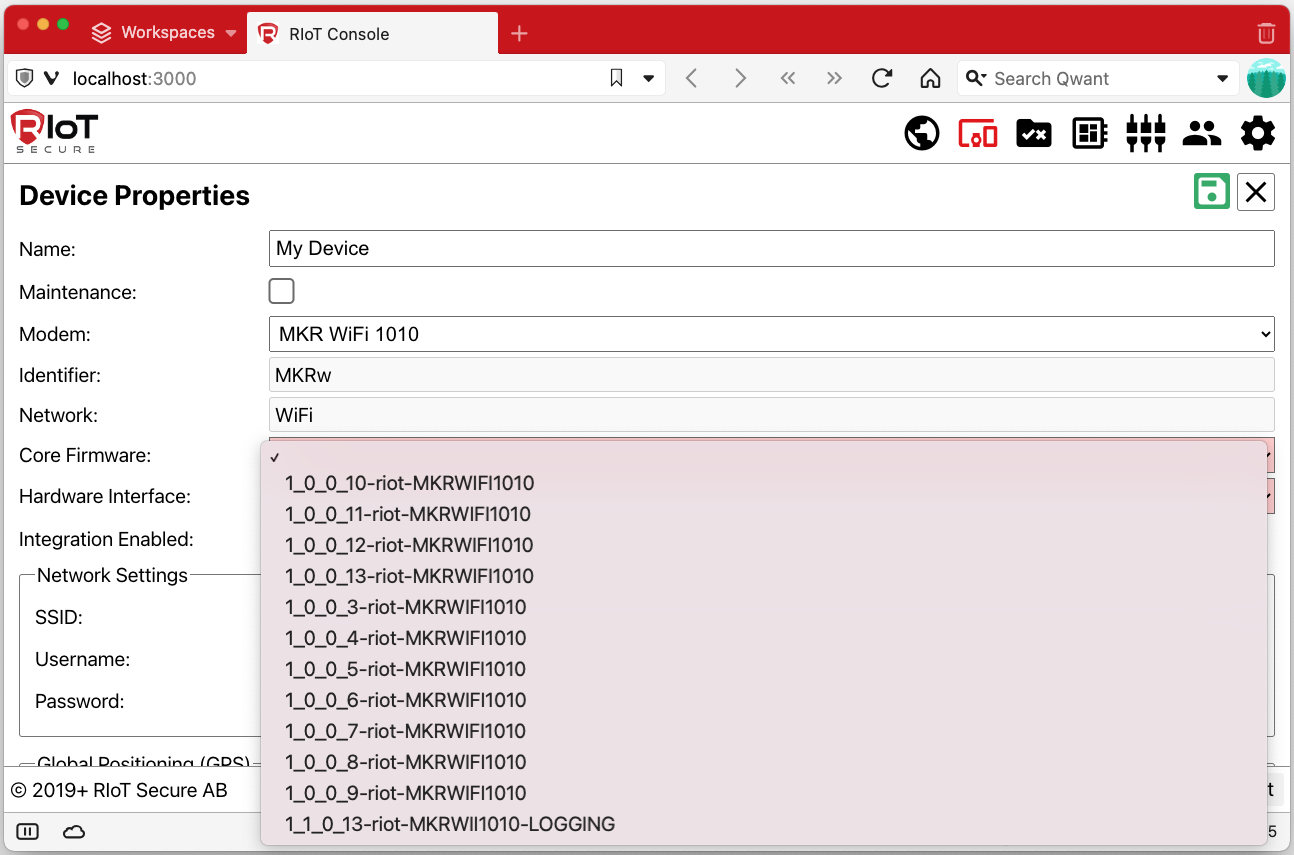
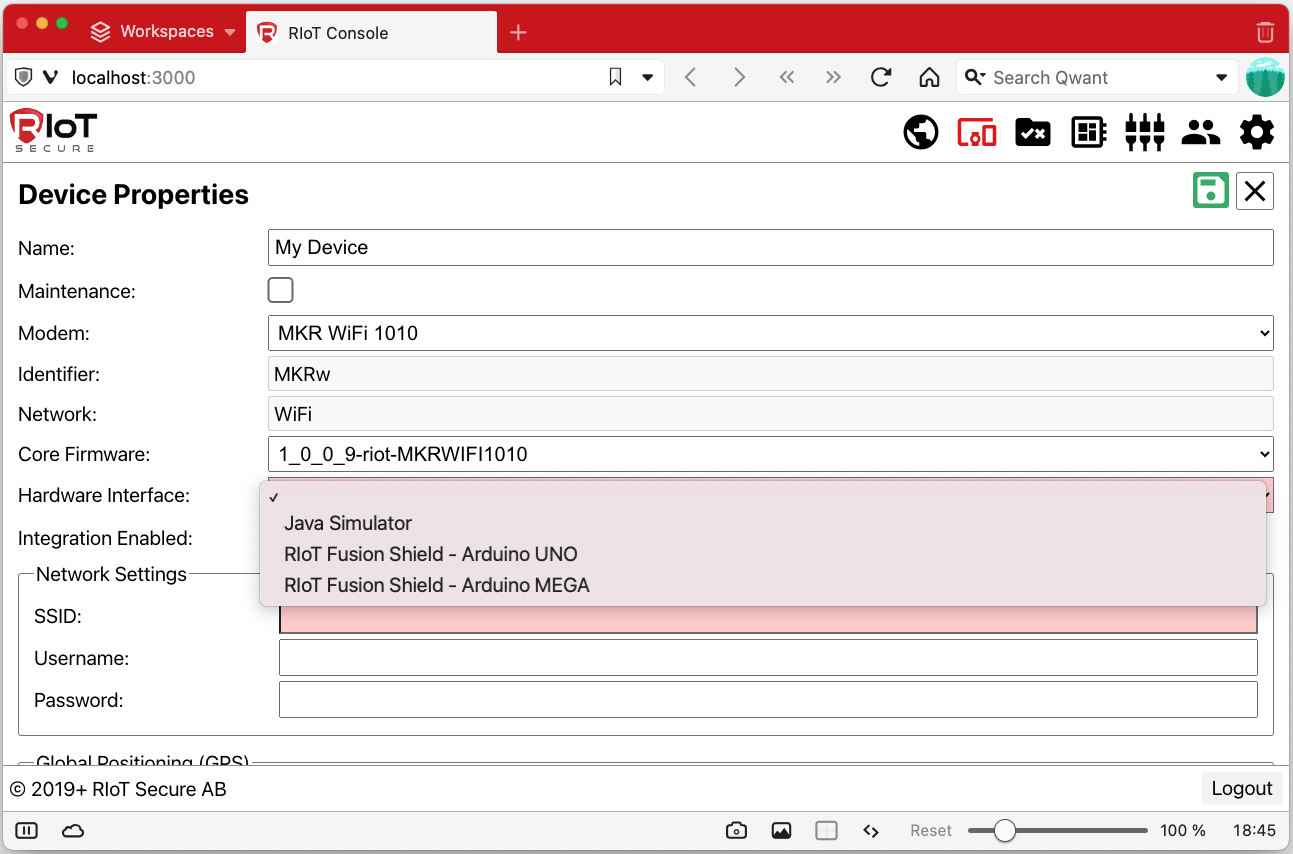
- When having selected the modem, the crossreference fields “Identifier” and “Network” are filled in automatically. New form entries “Core Firmware” and “Network Settings” arfe displayed as a result (these are multiobjects that depend on the crossreference fields).
- The “Core Firmware” field is a multiobject that displays its menu content based on the value of the “Identifier” entry.
- The “Hardware Interface” menu selects the hardware of the IoT device (this is a static menu).
- The “Netfork Settings” subform is a multiobject, that depends on the value of the “Network” crossreference field.
- If a different selection is made in the “Modem” menu, the crossreference fields will be recomputed and the dependent fields will be cleared. In this screenshot the “Java Simulator” modem is selected, which is a simulated modem used for testing purposes.
- The “Core Firmware” menu has now changed.
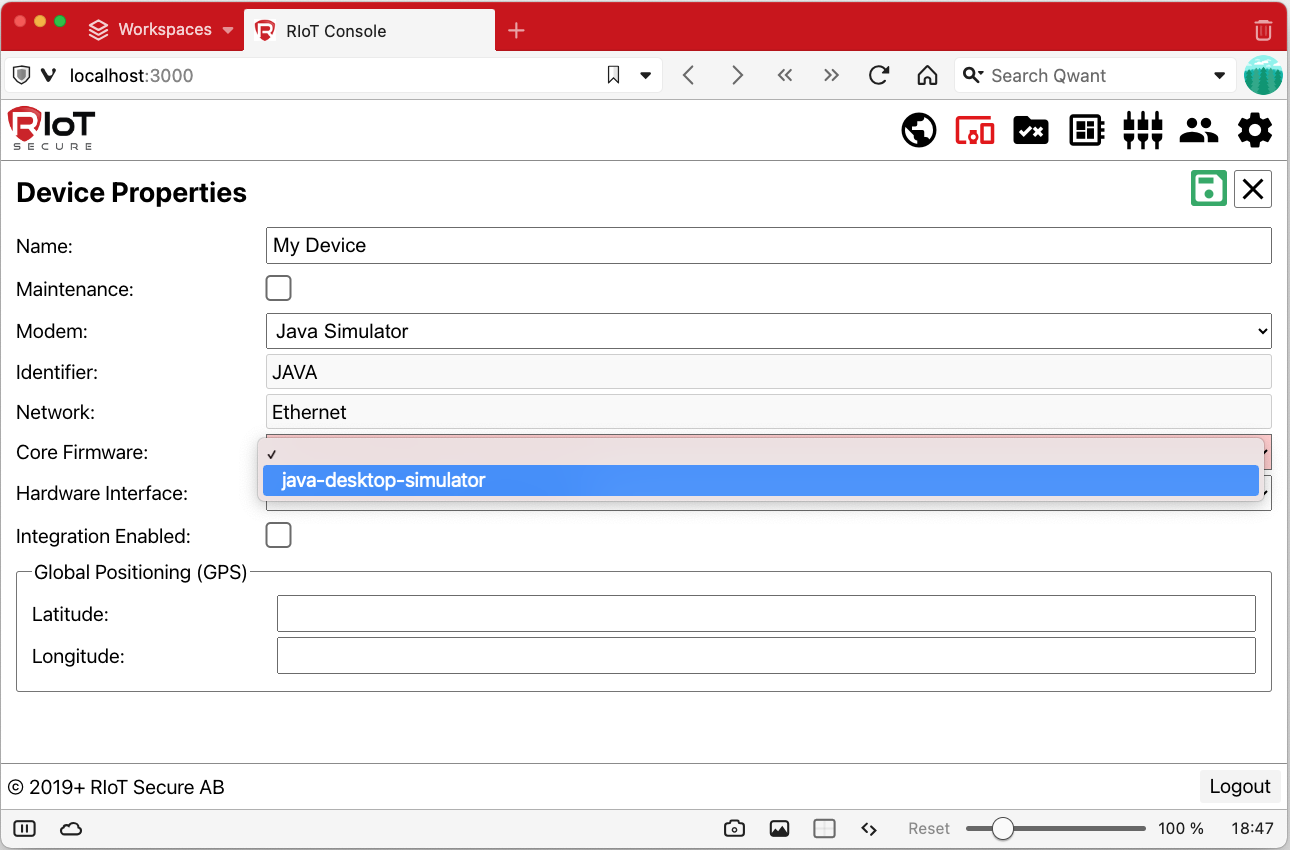
- The “Network Settings” subform is now empty, since the “Ethernet” network setting used by the Java Simulator does not require any additional configuration.
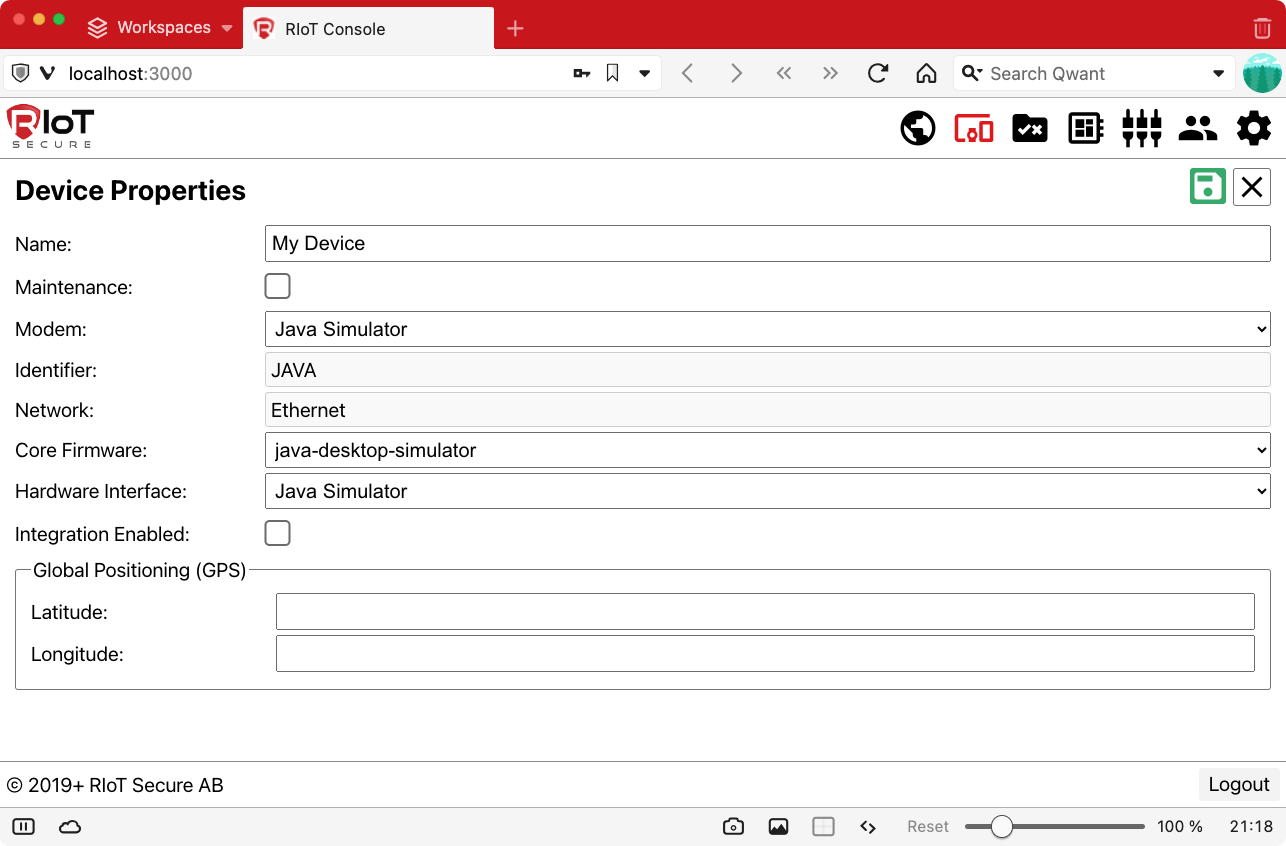
The above examples showcase the mechanisms provided by crossreferences and multiobjects. The source code for the React Management Console illustrates how these mechanisms can be implemented to generate a dynamic user interface programmatically.
5. Object Creation
5.1. Overview
To create entities and assets, the POST request is used.
In the following sections, creation of entities and assets is described.
An important difference between the two object types is the data sent with the POST request:
- Entities are created by sending JSON data in the POST request
- Assets are created by sending multipart form data in the POST request.
5.1. Entity Creation
Entities are created by sending a POST request with a JSON object that contains data for the “keys” properties specified in the schema.
Some entities also have an additional “atom” properties in the schema, that signify data that should be included in the JSON data (see section below for further details on atom properties).
5.1.1. Overview
To create an entity, the basic procedure is as follows:
- lookup the keys in the schema
- create JSON data with the keys
- send a POST request with the JSON data
5.1.2. Example - create a modem
This example shows how to create a new modem entity (note that only the admin user may create new modems).
The schema for modem is obtained with this request:
OPTIONS /modem
The following is the (partial) schema for the modem entity. The schema contains the names of the keys properties:
{
  "$comment": "oasis-entity",
  "$schema": "modem",
  "type": "object",
  "properties": {
    "id": {
      "type": "integer",
      "readOnly": true
    },
    "keys": {
      "$schema": "modem.keys",
      "type": "object",
      "properties": {
        "arch": ...,
        "bus": ...,
        "flash": ...,
        "frequency": ...,
        "identifier": ...,
        "image": ...,
        "manufacturer": ...,
        "name": ...,
        "network": ...,
        "ram": ...
      },
      "propertiesOrder": [
        "image",
        "name",
        "identifier",
        "manufacturer",
        "network",
        "arch",
        "frequency",
        "bus",
        "flash",
        "ram"
      ],
      ...
    },
    ...
  },
  ...
}
When the keys are known (by using the schema to look them up, either manually or programmatically), the JSON data for the modem can be constructed.
Here is an example:
{
  "keys":
  {
    "name": "Modem MKR WiFi 1010",
    "manufacturer": "Arduino",
    "image": "image_modem-mkr-wifi-1010",
    "network": "WiFi",
    "arch": "samd",
    "flash": 262144,
    "ram": 32768,
    "identifier": "MKRx",
    "frequency": 48,
    "bus": 32
  }
}
To create a new modem with the above data, send this request:
POST /modem
5.1.2. Example - create a packet
This example shows how to create a “packet” entity.
The packet object defines the layout of the data (on the bit level) sent from an IoT device to the cloud server.
Packets belong to a tenant, and tenant admin users can create new packet objects.
A packet has the following keys:
| Property | Description |
|---|---|
| name | a string |
| identifier | a single character |
| component | an array of packet data specifiers |
A packet can contain one or more components. Components contain packet data, and may be of different types.
Packets belong to a tenant. A tenant may have many packets. A packet specifies the layout of the data - it is a type specification for data sent from IoT devices to the server. The application firmware (written in C/C++) running on the device has code that assembles data according to the packet specification. The data is then sent to cloud server.
Here is an example of a JSON packet definition that contains a “range” component that represents temperature data:
{
  "keys": {
    "name": "Temperature Packet"
    "identifier": "t",
    "component": [
      {
        "order": 0,
        "name": "Temperature",
        "format": "range",
        "value": {
          "bitdepth": 8,
          "units": "c",
          "minimum": -100,
          "maximum": 100
        }
      }
    ]
  }
}
The packet type is created by sending the above JSON data in a POST request, specifying the tenant id that the packet should belong to in the request URI. Here is an example:
POST /tenant/2/packet
The schema for packet contains definitions for all available component types. The following is a partial listing of the packet schema:
{
  "$comment": "oasis-entity",
  "$schema": "tenant.packet",
  "type": "object",
  "properties": {
    "keys": {
      "$schema": "tenant.packet.keys",
      "type": "object",
      "properties": {
        "component": {
          "$schema": "tenant.packet.keys.component"
          "$comment": "oasis-array",
          "type": "array",
          "items": {
            "type": "object",
            "properties": {
              "order": ...,
              "name": ...,
              "format": {
                "$comment": "oasis-select",
                "type": "string",
                "enum": [
                  "range",
                  "scalar",
                  "enum",
                  "bitfield",
                  "integer",
                  "string"
                ],
                "required": true
              },
              "value": {
                "$comment": "oasis-multiobject",
                "$id": "#component-@format",
                "type": [
                {
                  "id-ref": "#component-",
                  "$id": "#component-range",
                  "type": "object",
                  "properties": ...,
                  ...
                },
                {
                  "id-ref": "#component-",
                  "$id": "#component-scalar",
                  "type": "object",
                  "properties": ...
                  ...
                },
                {
                  "id-ref": "#component-",
                  "$id": "#component-enum",
                  "type": "object",
                  "properties": ...,
                  ...
                },
                {
                  "id-ref": "#component-",
                  "$id": "#component-bitfield",
                  "type": "object",
                  "properties": ...,
                    ...
                },
                {
                  "id-ref": "#component-",
                  "$id": "#component-integer",
                  "type": "object",
                  "properties": ...,
                  ...
                },
                {
                  "$comment": "oasis-contextual",
                  "id-ref": "#component-",
                  "$id": "#component-string",
                  "type": "object",
                  "properties": {},
                  ...
                }
                ]
              }
            },
            ...
          },
        },
        "identifier": ...,
        "name": ...
      },
      ...
    },
    ...
  },
  ...
}
5.2. Atom Properties (asset and entities)
The “atom” field is present in asset schemas and some entity schemas. This field contains the properties and property schemas to be used when creating the asset or entity.
Atom properties are “helpers” used when creating objects; the atom field itself is not stored in the created object.
5.2.1. Asset creation
Assets are created using the “atom” properties specified in the schema.
The following schema section contains the “atom” section for the firmware application asset:
"$comment": "oasis-asset",
"$schema": "tenant.firmware_appl",
"type": "object",
"properties": {
  "name": ...,
  "atom": {
    "$schema": "tenant.firmware_appl.atom",
    "type": "object",
    "properties": {
      "description": ...,
      "identifier": ...,
      "microcontroller": ...,
      "name": ...,
      "version": ...
    },
    "propertiesOrder": [
      "name",
      "microcontroller",
      "version",
      "identifier",
      "description"
    ]
  },
  ...
},
...
The atom schema specifies the properties to be included in the multipart POST request to create the asset.
In addition to the atom properties, the multipart request should also contain an “asset” property, which specifies the file data sent with the request.
Note that the schemas for assets do not contain the actual schema for the “asset” property. It is implicitly defined as follows:
{
  $comment: "oasis-file",
  required: true,
  type: "file"
}
The atom field for assets contains all properties needed to create the asset, except for the “asset” property, which is assumed to be always present by convention.
The POST request body should contain multipart form data with the required entries.
In the case of the firmware application asset, the data fields are:
| Property | Description |
|---|---|
| name | string with the unique name of the firmware |
| microcontroller | string with the name of the microcontroller |
| identifier | string with the modem identifier |
| description | string with a short description of the firmware |
| asset | multipart file data field with the binary data for the firmware |
The following POST request creates a new firmware application asset for the tenant with id 2:
POST tenant/2/firmware_appl
5.2.2. Entity creation and atom properties
Atom properties may also be present in entity schemas. In this case, the “atom” field of the schema contains additional properties needed to create the entity.
Normally, the properties in “keys” are used when creating an asset (using a POST request). However, when the “atom” field is present in an entity schema, that means extra properties are required, in addition to those specified under “keys”.
Here is an example from the tenant user schema:
{
  "$comment": "oasis-entity",
  "$schema": "tenant.user",
  "type": "object",
  "properties": {
    "id": ...,
    "id_tenant": ...,
    "atom": {
      "$schema": "tenant.user.atom",
      "type": "object",
      "properties": {
        "type": {
          "$comment": "oasis-checkbox",
          "type": "string",
          "enum": [
            "admin",
            "viewer"
          ],
          "required": true,
          "$schema": "tenant.user.atom.type"
        }
      },
      "propertiesOrder": [
        "type"
      ]
    },
    "keys": {
      "$schema": "tenant.user.keys",
      "type": "object",
      "properties": {
        "name": ...,
        "password": ...,
        "phone": ...,
        "username": ...
      },
      "propertiesOrder": [
        "username",
        "password",
        "name",
        "phone"
      ],
      ...
    },
  },
}
In the above schema, we can see that the “atom” entry contains one property named “type”, that can have the value “admin” or “viewer”. The “admin” type specifies that a tenant admin user should be created (not system admin, but tenant admin), and the “viewer” type specifies that a tenant viewer user should be created.
To create a new user for a tenant, the “type” property should be included in addition to the properties under “keys”.
Here is an example of JSON data for creating a new tenant viewer user:
{
  "type": "viewer",
  "keys":
  {
    "username": "user@email.com",
    "password": "XXXXXXXXXXXXXXXXXXXXXXXXXXXXXXXX",
    "name": "Viewer User",
    "phone": "+46123456789"
  }
}
Note that atom properties are included at the top-level, and not under “keys”.
The data is submitted with a POST request that specifies the tenant for which the user is to be created, for example:
POST /tenant/2/user
5.3. Creating Tenants
Tenants can only be created by the admin user.
When a tenant is created, the system automatically creates a default admin user for the tenant, based on the information provided by the “atom” field in the JSON data submitted with the POST request.
The default tenant admin user can then be used to create new users for the tenant (and also create new tenant admin users).
6. Web Application Development
This section describes some key points in the development of web applications like the OASIS Management Console.
For a full code example, see the React Management Console.
6.1. Application architecture
When developing a web application that uses the REST API, different approaches can be taken regarding how to structure the application, and how to make use of the schema.
A web application can access the REST API directly, using a two-tier architecture. The REST API supports CORS and allows cross-origin requests, which means that the application can send requests directly to the OASIS REST API server.
Another approach is to use a three-tier design, where the application makes request to an application server that in turn sends requests to the REST API server. In this case, the middle tier can we written in for example PHP running on a web server.
6.2. Schema usage
It is recommended to use the schema for validation of user input.
The schema can also be used to programmatically generate UI components. Alternatively, the UI components can be written “by hand”, using the schema for input validation. The approach taken will depend on the scope of the application and the user requirements.
For highly customized user interfaces with specific requirements, the UI elements can be coded by hand.
The OASIS Management Console relies heavily on the schema to programatically create UI components, but also features custom coded elements, such as the Map screen.
6.3. Reading Data and Schema
Fundamental to any application is to display data.
6.3.1. Read objects
To read assets or entities using the REST API a GET request is used. The “?expand” parameter is important, as it includes full objects in the response.
For example, to read all devices for tenant with id 2, use the following request:
GET /tenant/2/device?expand
When a GET request is made for a collection of objects, the result is returned as an array of objects.
When a request is made for a specific object, the result is returned as a single object.
This request will return a single device object (the device with id 3):
GET /tenant/2/device/3?expand
6.3.2. Read schemas
To retrieve the schema for an object, the OPTIONS request is used.
For example, to get the schema for the device object, the following request is used:
OPTIONS /tenant/2/device
6.4. Merging Properties (keys and info)
A frequent operation is to recursively traverse the schema, for example to find the subschema for different properties.
Some objects, notably the “device” entity, has both keys and info properties. This adds complexity to the schema traversal algorithm, since both keys and info properties need to be traversed in parallell.
For this reason, it can be practical to use a merged version of the schema, that contains both keys and info properties under keys. Keys and info also need to be merged in the data objects.
A unified data structure, where all properties are under keys, simplifies object traversal and property lookup.
Merging can be done by using a recursive decent algorithm. An example of this is available in the file MergeKeys.js, in the code for the React Management Console.
6.4.1 Merging object properties
Objects can be merged by recursively traversing keys and info properties in parallell.
If a “primitive” value (non-object property) exists under both keys and info, the property under keys should be overwritten by the property under info.
Here is an example of an non-merged device object that has keys and info as separate properties:
{
  id: 1,
  keys: {
    firmware_core: "1_0_0_7-riot-MKRWIFI1010",
    gps: {
      latitude: "",
      longitude: ""
    },
    identifier: "MKRw",
    integration: false,
    maintenance: false,
    microcontroller: [
      {
        name: "ATmega328P",
        identifier: "A421",
        firmware_appl: "Blinky-1"
      }
    ],
    name: "Arduino Uno",
    settings: {
      SSID: "Moto G42",
      username: "",
      password: "dala1234"
    },
    modem: "MKR WiFi 1010",
    network: "WiFi",
    interface: "RIoT Fusion Shield - Arduino UNO"
  },
  info: {
    current_firmware_core: "1_0_0_7-riot-MKRWIFI1010",
    enrolled: true,
    gps: {},
    guid: "524D6F554D4B527701237C774708FFDF",
    memory: ...,
    microcontroller: [
      {
        current_firmware_appl: "Blinky-1"
      }
    ],
    modem_info: {
      MAC: "F0:08:D1:CE:D8:04",
      BSSID: "12:85:F1:AA:FE:5A"
    },
    power: {
      ignition: false
    },
    server: ...,
    ts_comms: 1677417643
  }
}
And here is the merged device object where info properties are under keys (the gps property and microcontroller.current_firmware_appl from info have been merged into keys):
{
  id: 1,
  keys: {
    firmware_core: "1_0_0_7-riot-MKRWIFI1010",
    gps: {}, <-- merged with info
    identifier: "MKRw",
    integration: false,
    maintenance: false,
    microcontroller: [
      {
        name: "ATmega328P",
        identifier: "A421",
        firmware_appl: "Blinky-1",
        current_firmware_appl: "Blinky-1" <-- merged with info
      }
    ],
    name: "Arduino Uno",
    settings: {
      SSID: "Moto G42",
      username: "",
      password: "dala1234"
    },
    modem: "MKR WiFi 1010",
    network: "WiFi",
    interface: "RIoT Fusion Shield - Arduino UNO",
    current_firmware_core: "1_0_0_7-riot-MKRWIFI1010",
    enrolled: true,
    guid: "524D6F554D4B527701237C774708FFDF",
    memory: ...,
    modem_info: {
      MAC: "F0:08:D1:CE:D8:04",
      BSSID: "12:85:F1:AA:FE:5A"
    },
    power: {
      ignition: false
    },
    server: ...,
    ts_comms: 1677417643
  },
  info: ... <-- original untouched info properties
}
6.4.2. Merging schema properties
Schemas are merged in a similar way as objects, by recursively traversing the keys and info properties of the schema.
The application should keep the original version of keys, since the keys are needed when creating new objects.
The original keys are also needed to filter out info properties when updating an object in a PUT request (the REST API will return an error if non-keys are present in the data sent to the server).
Alternative methods could be used to keep track of which properties belong to keys, but keeping a copy of the original keys property tree is a workable solution.
Here is the original (partial) schema for the “device” entity, with keys and info not yet merged:
{
  $comment: "oasis-entity",
  $schema: "tenant.device",
  type: "object",
  properties: {
    id: ...,
    keys: {
      properties: {
        firmware_core: ...,
        gps: ...,
        identifier: ...,
        integration: ...,
        interface: ...,
        maintenance: ...,
        microcontroller: {
          $comment: "oasis-array",
          type: "array",
          minItems: 0,
          maxItems: 4,
          derivative: true,
          items: {
            type: "object",
            properties: {
              name: ...,
              identifier: ...,
              firmware_appl: ...
            },
            propertiesOrder: [
              "name",
              "identifier",
              "firmware_appl"
            ],
            propertiesCollectiveHide: []
          },
          $schema: "tenant.device.keys.microcontroller"
        },
        modem: ...,
        name: ...,
        network: ...,
        settings: ...
      }
    },
    info: {
      properties: {
        current_firmware_core: ...,
        enrolled: ...,
        gps: ...,
        guid: ...,
        memory: ...,
        microcontroller: {
          $comment: "oasis-array",
          type: "array",
          derivative: true,
          items: {
            type: "object",
            properties: {
              current_firmware_appl: ...
            },
            propertiesOrder: [
              "current_firmware_appl"
            ],
            propertiesCollectiveHide: [],
            readOnly: true
          },
          readOnly: true,
          $schema: "tenant.device.info.microcontroller"
        },
        modem_info: ...,
        power: ...,
        server: ...,
        ts_comms: ...
      }
    }
  }
}
And here is the merged schema, with info properties under keys:
{
  $comment: "oasis-entity",
  $schema: "tenant.device",
  type: "object",
  properties: {
    id: ...,
    origKeys: ..., <-- copy of original keys schema
    keys: {
      properties: {
        firmware_core: ...,
        gps: ..., <-- merged with info
        identifier: ...,
        integration: ...,
        interface: ...,
        maintenance: ...,
        microcontroller: {
          $comment: "oasis-array",
          type: "array",
          minItems: 0,
          maxItems: 4,
          derivative: true,
          items: {
            type: "object",
            properties: {
              name: ...,
              identifier: ...,
              firmware_appl: ...,
              current_firmware_appl: ... <-- merged with info
            },
            propertiesOrder: [
              "name",
              "identifier",
              "firmware_appl",
              "current_firmware_appl" <-- merged with info
            ],
            propertiesCollectiveHide: []
          },
          $schema: "tenant.device.keys.microcontroller"
        },
        modem: ...,
        name: ...,
        network: ...,
        settings: ...,
        current_firmware_core: ...,
        enrolled: ...,
        guid: ...,
        memory: ...,
        modem_info: ...,
        power: ...,
        server: ...,
        ts_comms: ...
      }
    },
    info: ... <-- original untouched info schema
  }
}
6.5. User Interface
This section contains a discussion of common UI functionality.
6.5.1. Table View
An application will commonly use the “list/detail” UI pattern.
A table view provides a listing of the objects the exists in the system. The list of objects can be sorted, filtered, searched etc, depending on the user requirements.
The attributes listed in the propertiesOrder and propertiesCollectiveHide fields of the schema can be used to decide which properties to display in the table view.
An application can customise which attributes to show. One approach is to overwrite the settings in the schema. Another approach is to introduce additional schema settings for customized views, or simply add configuration parameters to the application that describes the desired view settings.
6.5.2. Object View
A common UI action is to open a detailed object view from a table view, e.g. by clicking on an entry in table.
An object view can use the propertiesOrder field in the schema to determine which attributes display, and get the property values from the object data.
The schema entries for the properties can be used to programatically generate UI input elements that also allow editing values (the readOnly schema attribute is used to determine if a property can be edited).
6.5.3. Accessing object properties
In some cases, properties presented in a table or object view need to be accessed at different levels of an object.
An example of this is the “id” and “name” attributes for entities and assets, which appear at the root level of the object. (The “id” attribute is a system generated numeric id, and the “name” attribute is a user defined string id.)
When using a merged object/schema, all other properties will appear under keys.
If the application wishes to display the id attributes, they must be access in the object root, and not under keys.
Here is an example of a device object (note that the device name is a property is under keys):
{
  id: 3,
  keys: {
    name: "Arduino Uno",
    ...
  }
}
Here is an example of a not-yet-merged firmware application asset (the asset “name” field is at the object root):
{
  name: "Blinky-1",
  info: {
    microcontroller: "ATmega328P",
    arch: "avr",
    identifier: "A421",
    version: "1.1.0.1",
    description: "Initial Blinky application",
    size: 2615,
    ts": 1677416062
  }
}
The merged version looks like this:
{
  name: "Blinky-1",
  keys: {
    microcontroller: "ATmega328P",
    arch: "avr",
    identifier: "A421",
    version: "1.1.0.1",
    description: "Initial Blinky application",
    size: 2615,
    ts": 1677416062
  }
}
Summary:
Merged versions of entities and assets objects unify attributes under keys, but the “id” and “name” identifiers need to be accessed individually.
6.5.3. Create a New Object
Use the schema to generate form input elements for keys properties, and/or atom properties.
To create entities, send JSON data with a POST request.
Example:
POST /tenant/2/device
To create assets, send multipart form data with a POST request.
The Javascript FormData object is used to create multipart data.
Here is an example:
// Create FormData array
const formData = new FormData();

// For each property in the object add it to the FormData array
// (the schema is not used here)
for (const propName in obj.keys)
{
  const propValue = obj.keys[propName];
  formData.append(propName, propValue);
}

// POST multipart form data
const uri = '/tenant/2/device';
const result = await restPostFormData(uri, formData);
For a full code example, see files restapi.js and AppActions.js in the React Management Console.
6.5.4. Update an Object
To update an entity, send JSON data with a PUT request. Assets cannot be updated once created.
Example:
PUT /tenant/2/device/3
When the user edits the form fields in the object view of the application, the underlying data object should be updated to reflect the changes. When the user saves the edits, the application sends a PUT request with the JSON data of the updated object.
Only properties under “keys” that are not readOnly should be present in the JSON data sent with the PUT request; otherwise the server will respond with an error. Any properties under “info” must not be included.
The application should track which properties have been edited, and include them in the data of the PUT request. It would be possible to include also properties that have not been edited/changed, but readOnly properties must not be present in the JSON data.
For example, if the user updates the “firmware_appl” property of the microcontroller of a device, this is the updated object data:
{
  keys: {
    microcontroller: [
      {
        name: "ATmega328P",
        identifier: "A421",
        firmware_appl: "Blinky-2", <-- Updated property
        current_firmware_appl: "Blinky-1" <-- merged with info
      }
    ]
  }
}
However, “current_firmware_appl” is a property that has been merged with “info”, so it has to be removed before the data can be sent.
Here is the data to be submitted with the PUT request (no “info” properties are present):
{
  keys: {
    microcontroller: [
      {
        name: "ATmega328P",
        identifier: "A421",
        firmware_appl: "Blinky-2" <-- Updated property
      }
    ]
  }
}
Only the microcontroller has been updated, so no other properties are present under keys. However, all fields in the microcontroller subobject must be present, even the ones that have not been updated, except for the properties that have been merged with info, in this case “current_firmware_appl”.
Use the original keys in the schema to filter out non-keys (and readOnly properties, if needed).
Example code (obj is the above Javascript object, id of device is 3):
const uri = '/tenant/2/device/3';
const json = JSON.stringify(obj);
const result = await restPutJson(uri, data);
For a full code example, see files restapi.js and AppActions.js in the React Management Console.
6.5.5. Delete an Object
To delete an object, a DELETE request is used.
Example:
DELETE /tenant/2/device/3